General Settings (eSignPlus)
This page allows the Administrator to set various system settings - such as the image that is to be displayed in the header and how documents are to be archived and indexed.
Click Administration > General Settings.
Click Edit.
General Settings Page
After clicking edit, the General Settings page appears with all fields unlocked.
Fields in the upper section of the page are common and will display with any lower screen tab selected.
The lower section of the page displays additional Settings Tabs which are explained in following topics.
Note: Not all settings tabs may be available for your installation. Tab contents will vary according to the add-ons and options used during your installation.

|
|
Home URL |
The URL for a site when the logo is clicked. |
||
|
|
Custom Label / URL |
Populates custom links that will display for all users under Processing > Custom Links. The browser must be restarted after changing these links. Note: Enter only a valid, known and controlled website URL. |
||
|
|
Custom Logo / Documents Key |
|
||
|
|
Allow XML View for Users |
(XML installations only) When this is selected, users (non-administrators) will be able to click on the primary applicant name and download or view a .zip file containing the contents of the XML data file when one has been passed from the host system. |
||
|
|
XML View Password |
(XML installations only) When Allow XML view for users is checked, users will be required to enter this password to download or view the contents of the XML data file passed from the host. |
||
|
|
Remove Option Default |
(XML installations only) When this check box is selected, on the Document Selection screen, documents that are added through Select Document Set will have their Remove checkbox checked. This setting is for documents that are part of a document set only and is not used for documents added manually to the document set by using the Add Available Documents link. (Default: Not checked). |
||
|
|
Retain Audit Trail (Days) |
The number of days that rows will be kept in the audit trail tables. [Default: 90 days] |
||
|
|
Session Audit Report Time Zone |
Time zone used for Session Audit Report. |
||
|
|
Password Unlock Period |
The number of minutes the user will have to wait before their password is automatically unlocked, if Auto-Unlock Password is checked. [Time range: 10-3600 minutes. Default: 30 minutes] |
||
|
|
Unknown Document Label |
(RTS installations only) Title of documents that shows for undefined documents. |
||
|
|
Define Image-Based Documents |
When selected, this RTS-only setting allows defining and editing image-based (OCR) documents. When not selected, the FI will not be able to define or edit image-based documents. [This setting requires HostAdmin activation. Default: Not selected] |
||
|
|
Allowed Domains |
|
||
|
|
Process Sessions on All Browsers (XML) |
Effectively, eSign is optimized for use with Internet Explorer. Selecting this setting will allow processing sessions on all browsers and will enable the Check out feature on the Documents Maintenance (XML) page. |
||
|
|
Settings Tabs |
Explained in the following. Some tabs may not be available for your installation. |
||
|
|
Action Buttons |
These actions apply to the upper and lower parts of the page.
|


The administrator may define how long documents are to be retained in Archive, and whether to archive documents by default.
After clicking Edit, the following fields are available for editing.

|
|
Action Buttons |
These actions apply to the upper and lower parts of the page.
|
|
|
Cases Refresh Rate |
The number of minutes between refreshing the Cases screen. (Default: 5 minutes) |
|
|
Cases Page Size |
The number of cases displayed on the Cases page |
|
|
Auto Load Cases |
When selected, and a user navigates to the Cases page, the cases will automatically populate based on the user default search parameters. When not selected, and a user navigates to the Cases page, the cases will not automatically populate. |
|
|
Remote Inbox Name |
This setting is used to define the shared inbox into which the download step will be received. This setting must be configured for the remote signing process in workflow to work. |
|
|
Allow to Select Workflow |
When selected, and a user processes a session, the Select Workflow pop up will always display. When not selected, and a user processes a session, the Select Workflow pop up will only display if the workflow name is not included in the session information. When not selected, if a workflow name is included in the session information, the Select Workflow pop up will not display. |
|
|
Archive Session after eDelivery |
When selected sessions will be automatically archived after eDelivery is clicked. When not selected sessions will not automatically be archived at that point. (Default: Selected) |
|
|
Use AD Manager |
When this setting is checked, Manager position information from the FI Active Directory will be used for routing workflows. When this setting is not checked, Manager positions must be defined separately under Workflow Permissions. |
|
|
LightsOut Workflow |
The default workflow for sessions processed in a LightsOut session. |
|
|
AdHoc Workflow |
The default workflow for sessions processed in an AdHoc session. |
|
|
Allow Ad Hoc Document Set |
This setting is used to turn off the Ad-hoc Document checkbox available under Workflow Builder > Document Set tab. This allows processing documents that are not associated with any document set. |
|
|
Retain workflow audit trail |
The number of days that a workflow audit trail is retained. (Default: 365 days) |
|
|
The number of days that completed or cancelled cases will be retained. (Default: 365 days) |
|
|
|
Title Field Description |
This field is used to change the title of the field description on several screens within eSignPlus. When the default of no text is used, the title field defaults to “Name”. |
|
|
Retrieved Session Default |
Determines the state of the document display icons when an active session is retrieved.
|
|
|
Use common scanner |
Causes all workstations to use a common scanner for attachments. When eSign is installed in a Thin-Client environment, this setting should be checked. When this setting is checked, the UI must be refreshed to display Scanner Settings under the Administrative Screens menu. |
|
|
BarCode Cover Pages |
Allows the user to upload cover pages for PDF417 barcodes. |
|
|
Loan Coupons Files |
Allows the user to upload a zip file containing the XML and PDF files that support Loan Coupons. [Only appears if the Loan Coupons add-on is activated.] |
|
|
Starter Checks Files |
Allows the user to upload a zip file containing the XML and PDF files that support Starter Checks. [Only appears if the Starter Checks add-on is activated.] |
|
|
Expand Session Detail Indexes by Default |
Select the checkbox to have document details expanded in the Sessions Details page. [Default: Not selected] |
|
|
Download Documents for Session Status (Days) |
Number of days to keep physical, archived documents after they are indexed before they are purged. Database records are not modified. [Default: 365] |


This tab lists settings used when archiving documents and sessions.

|
|
Action Buttons |
These actions apply to the upper and lower parts of the page.
|
|
|
Encrypt Archive Documents |
This setting protects archived PDF documents by encrypting them. (Default: Checked) |
|
|
Encrypt Password |
A password is required to change the status of Encrypt Archive Docs. Contact Support for a password. [Only appears if the Encrypt Archive Docs setting is changed.] |
|
|
Retain Archived History Docs (Days) |
The number of days to keep archived documents history. (0-2555 days [7 years] – Default: 360 days). |
|
|
Download Imaging Index Service |
This button may not display for your installation. Clicking this button installs the Imaging Index Service on the current machine and should be performed on the Imaging Index Service server machine for your FI. Refer to Imaging Index Service Client Installation . |
|
|
Auto-fill indexes on Session Details |
When checked, index field information missing from individual documents will automatically be populated on the user Documents Submitted screen from index field information extracted from other documents in the document set. When not checked, missing field information will not automatically be populated, but the user will still have the option of clicking the Fill Indexes link. |
Imaging Index Service Client Installation
|
Note: |
The Imaging Index Service Client connects to the IMM eSign Cloud using REST API with the institution-specific download key over HTTPS Imaging Index Service is a component that downloads Financial Institution documents which have been fully signed to be archived in the imaging system using an HTTPS Restful Web Service that is part of IMM eSign Cloud Service. This component can be downloaded via the IMM eSign Admin portion specific to your institution and imaging system requirements. The Imaging Index Service can be installed on a workstation or a server within your Financial Institution environment. Please discuss in detail with your implementation person. This procedure may not be required for your installation. Please contact support for assistance. When required, this procedure should be performed from your local FI Imaging Service Client machine. .NET Framework 4.6.2 is required. For each host, easily configure all Financial Institutions from the same machine. The manual steps required to customize the Imaging Client component are automated for multi-tenant environments. Installing this option will create a scheduled task on the Imaging Service Client machine. The logon account for the machine used to install Imaging Index Service Client must have rights to Log on as a batch job. |
From Administration > General Settings, click the Imaging Index Service Client Installation.

|
1 |
Click Edit. |
|
2 |
Click Download Imaging Index Service. |
After clicking the Download Imaging Index Service button,
A pop-up window appears.

Click Run.
A publisher warning may appear.

Click Run.
|
Note: |
An additional warning may appear if the DMS folder is not exempted from anti-virus scanning. |
The Extract Setup Files pop-up window appears.

|
1 |
Click Browse to select a different location. |
|
2 |
Click Start to extract the installation files. |
If a User Account Control window appears, click Yes.
The Imaging Index Service Configuration popup displays.

|
1 |
Enter C:\Program Files\IMM or click Browse to navigate to C:\Program Files\IMM. After the Imaging Index Service Client is installed, a folder for each FI will be placed in this location. |
|
2 |
Select a time to run the task in the Task Scheduler. |
|
3 |
Click Install to continue. |
| The Imaging Index Service window refreshes. | In the Edit Configuration window, | ||||||||
|
|
|


The Imaging Index Service window refreshes.
Documents for existing, completed sessions will be moved to the Imaging System Settings, Destination Location (HostAdmin Settings).

|
|
Click Continue to repeat. |
|
|
Click Close. |
After installation the eSignImagingClient task will be added to Task Scheduler.
This task will download and index documents that have not been indexed.
From a Command prompt or Run prompt,
Type taskschd.msc.
Click Task Scheduler Library > IMM.

This task is scheduled for 5:14 AM by default. This time can be adjusted by editing the task.
The following folders must be exempted from Live or Active Virus Scanning and from your Indexing Service.
- C:\ProgramFiles\IMM\DMS Client
- The folder listed in HostAdmin > Administration > Financial Institutions > Other Settings tab Destination Location.
The Imaging Index Service installation is complete.

|
|
Action Buttons |
These actions apply to the upper and lower parts of the page.
|
|
|
Check Out |
Allows the user to extract the parameter.xsl (txt or csv) file or other files used by the FI, along with any associated data definition files. The files are downloaded to the user's machine. This file may then be sent to support. |
|
|
Check In |
Allows the user to install the parameter.xsl (txt or csv) file or other files used by the FI, along with any associated data definition files. The files may be uploaded individually. The parameter.xsl (txt or csv) file is stored in the FI's folder. |
This tab only displays when XP Host Specific Files have been installed on your server.

After clicking Edit the following fields are available for editing.
|
|
Action Buttons |
These actions apply to the upper and lower parts of the page.
|
|
|
Admin Base Page URL |
Allows the user to specify the page that an XP admin user will return to when they use the Back To XP link. |
|
|
XP Database |
|
|
|
Edit Document Sets |
When this is checked, the admin user will be able to maintain document sets without being synced with XP. A warning message will display reminding the admin user to synchronize the document sets with XP before processing sessions. (Default: Not Selected) |
This tab is only available if the eSign Zip Files Add-On is activated by the eSign Administrator.

|
|
Action Buttons |
These actions apply to the upper and lower parts of the page.
|
|
|
Zip Handler Assembly |
Preset to IMM.TeSign.BL.ProSign.dll |
|
|
Zip Handler Class |
Preset to IMM.TeSign.BL.ProSign.ZipHandler |
|
|
Zip Handler Password |
Each zip package is password protected. The password entered here must match the password for the zip package in order to extract PDF files for definition in the imaging system and for processing in Client. |
This tab is used to modify eSign Client settings.
This tab will only display if Enable Client is selected by the Host Administrator.
Note: All clients on all workstations must be restarted for changes to take effect.


|
Action Buttons |
These actions apply to the upper and lower parts of the page.
|

|
Input Folder 1 | Location of the Input Folder 1. (Required) |

|
Input Folder 2 | Location of the Input Folder 2. (Optional) |

|
Static Output Folder |
Used by ARGO Integration. eSign Client calls the Dynamic Printer to convert printed documents into .PDF documents. ARGO uses the static folder to hold the created .PDF document. After the document creation is complete, the .PDF document is copied into Input Folder 1 along with the .XML (idx) information. |

|
Document Expiration (Minutes) |
This setting determines how long printed/ saved documents are retained for use. After the time limit is reached the document will be purged and no longer available in the Collected Documents page. |
|
|
Default Browser |
Default browser used to launch the Collected Documents page.
|
|
|
Auto Launch eSign in Browser |
When documents are printed from the eSign Client printer, control how users are notified if the default eSign web browser is already open on their workstations. The default eSign web browser is determined by the Default Browser setting. Auto Launch eSign in Browser is selected by default. When Auto Launch eSign in Browser is selected and the default eSign web browser is already open, printed documents are displayed on the Collected Documents page in a new tab. Every time documents are printed, a new tab opens in the default eSign web browser, which may result in multiple Collected Documents pages in multiple tabs. A pop-up notification is also displayed to alert the user that new documents were printed. Refer to the following example. The pop-up notification will disappear after the number of seconds selected in Display Notification for (Seconds).
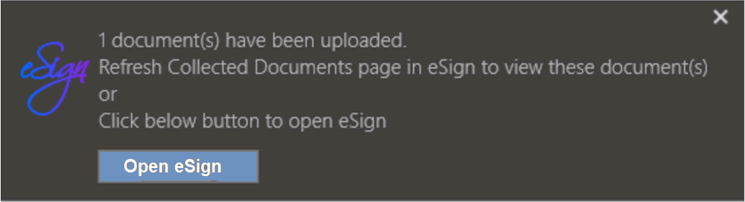
When Auto Launch eSign in Browser is not selected and the default eSign web browser is already open, a pop-up notification alerts the user that new documents were printed. The notification prompts the user to refresh the Collected Documents page or click a button to open eSign. Refer to the following example. The pop-up notification will disappear after the number of seconds selected in Display Notification for (Seconds).
|
|
|
Display Notification for (Seconds) |
The number of seconds the optional pop-up notification will remain onscreen for the user. [Default/Minimum value: 5 seconds, Maximum value: 20 seconds] |
|
|
Access Valid for (Days) |
This setting manages long-term access authentication. The number of days user access to the documents is valid. |
|
|
Delay for Index File (Seconds) |
This setting is used when a PDF document is paired with an index file for processing and the client will wait for X number of seconds based on DelayForIndexing for the paired index file before processing the PDF documents. [0-60 seconds - Default: 0 seconds] |
|
|
Retry Attempts for File Access |
The number of times eSign client attempts to check if the PDF/XML/IDX file is accessible (locked) or not. [Default: 3 tries. Min: 1, Max: 5] |
|
|
Delay for File Access (Seconds) |
This setting determines the number of seconds client will wait after each retry to check if the PDF/XML/IDX file is accessible by client or not. [Default: 2seconds. Min: 1, Max: 3 |
|
|
Enable User Level Settings |
This setting determines if users can locally edit eSign Client settings. (Default: Not Selected) |


Note: All clients on all workstations must be restarted for changes to take effect.
The Platform Settings tab displays the current platform settings for the “Send to Imaging” preferences. When Override is selected, these settings can be overridden at the FI-level.
This tab is always unlocked.
Platforms are only available if they are set by the Host Administrator. The FI Administrator cannot add or delete entries from this screen but can edit the Override and Send to Imaging (FI) settings.

|
|
Settings |
|
This page allows the FI Administrator to set all API keys to use a single-source API key for the Financial Institution.
Note: Your FI may not use all API Keys.

|
|
Action Buttons |
These actions apply to the upper and lower parts of the page.
|
|
|
API Key / Confirm API Key |
The API Key used by the FI is the primary key for communicating with the eSign Administrator components and also functions as the database password. The API Key must be from 8 to 20 characters long and contain at least one lower case letter, one upper case letter, one special character and one digit. The Confirm API Key value must identically match the API Key. Note: When entering keys and passwords, click the Eye icon After the FI is created, the API Key can be edited by the FI Administrator on the General Settings page, Manage API Keys tab. |
|
|
Use API key for TeSignLite Access |
When enabled the API Key shown above will be used as the Access Password for TesignLite Access. |
|
|
Use API key for Session Status API |
When enabled the API Key shown above will be used as the Access Password for Session Status API. |
|
|
Use API key for XML InSession Signing |
When enabled the API Key shown above will be used as the Access Password for XML InSession Signing. |
|
|
Use API key for File Transfer Service |
When enabled the API Key shown above will be used as the Access Password for File Transfer Service. |
 to display masked characters.