eSignature Settings
Refer to the User Guide for a detailed explanation of signing procedures.
Click Administration > eSignature.
This page is unlocked by default. Changes will be saved after clicking Save.
The eSignature Settings Page appears with the Defaults tab selected.
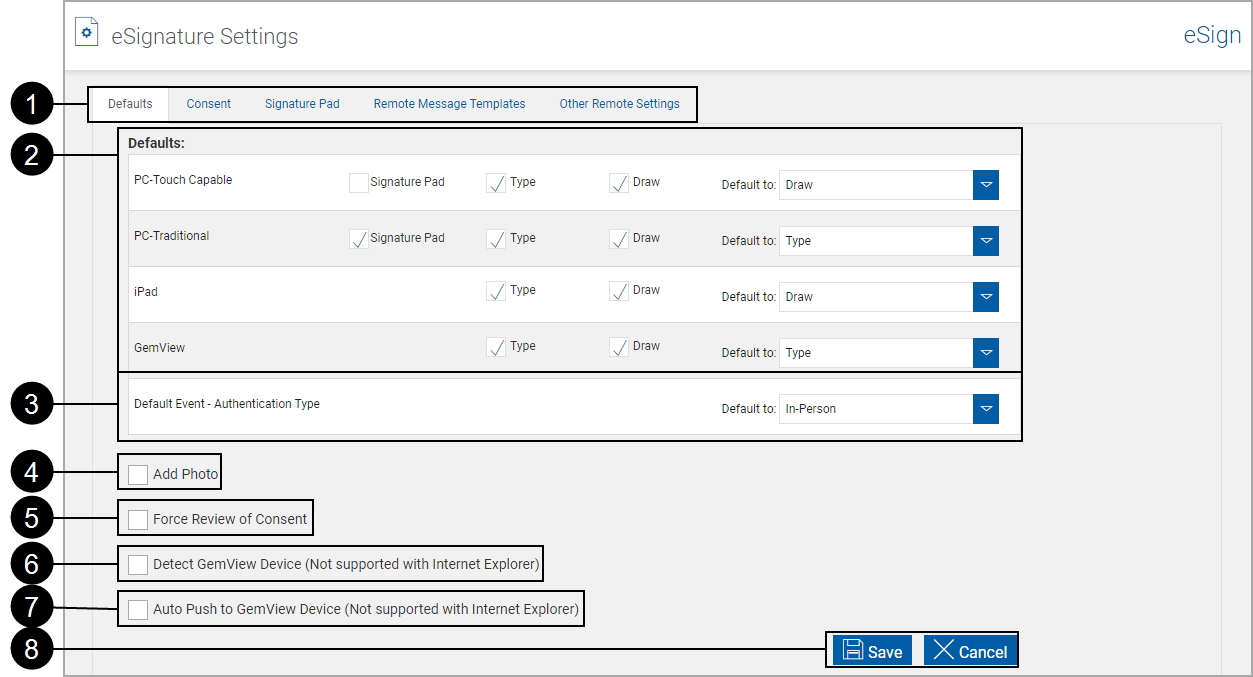
This tab displays the default settings for available signing methods and platforms. These settings determine what the user will be able to use during the signing experience.
|
|
eSignature Settings Tabs |
Defaults, Consent, Signature Pad, Remote Message Templates, Other Remote Settings. Note: The Remote Message Templates and Other Remote Settings tabs will not be available if the Remote Signature Add-On has not been activated or the evaluation period has expired. |
|
|
Defaults |
Set signing devices and methods. Devices:
Signing Methods:
|
|
|
Add Photo |
When selected, the Add Photo button appears on the eSignature Consent page. |
|
|
Force Review of Consent |
When selected, signers and viewers will be required to review the consent page. |
|
|
Detect GemView Device (Not supported with Internet Explorer) |
GemView devices function as a mirror to the eSign application on the client workstation and allows the user to guide a signer through the review and signing process.
|
|
|
Auto Push to GemView Device (Not supported with Internet Explorer) |
GemView devices function as a mirror to the eSign application on the client workstation and allows the user to guide a signer through the review and signing process.
|
|
|
Action Buttons |
|
The administrator can use the options on this page to set the signing methods and defaults and modify the FI eSignature Consent Text.
The consent text will display when a member signs a document. The wording at this point is only a recommendation; it must be updated for your location before using eSignature for member signing.
|
|
eSignature Settings Tabs |
Defaults, Consent, Signature Pad, Remote Message Templates, Other Remote Settings. Note: The Remote Message Templates and Other Remote Settings tabs will not be available if the Remote Signature Add-On has not been activated or the evaluation period has expired. |
|
|
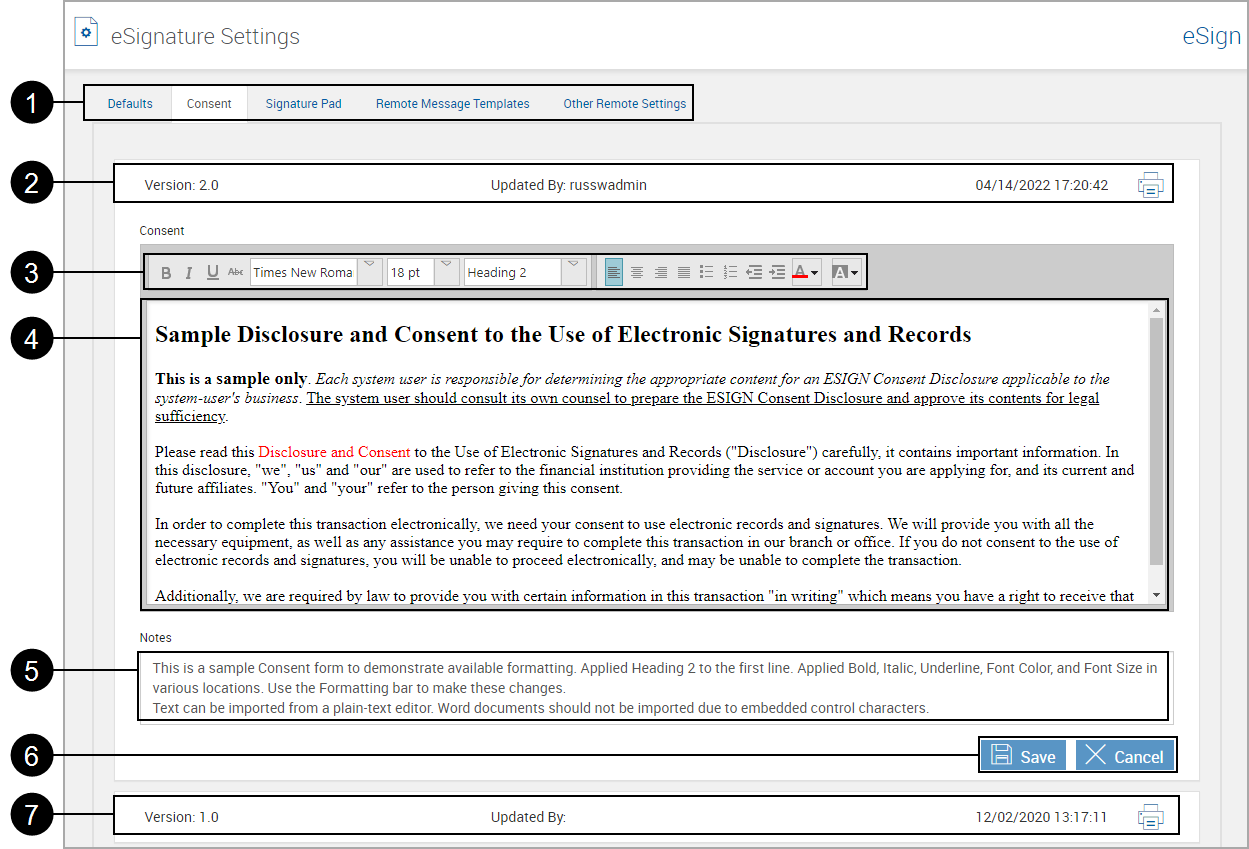
Title Bar |
The title bar displays information about the currently selected Consent version. A Print icon allows printing the Consent form. Click this bar to collapse or expand the current Consent form display area.
|
|
|
Formatting Toolbar |
The consent is displayed when a member signs a document. The wording at this point is only a recommendation; it must be updated for your location before using eSignature for member signing. This area is used to apply various formatting controls to the Consent form. Highlight text and click the desired formatting change. The administrator can use these options to modify the FI eSignature Consent Text. If the Consent form has not been edited, the Formatting Toolbar will display after clicking in the text area. Note: Fonts used and displayed depend on the availability of fonts in the readers' client machines. If the font you use is not available on other readers' systems, the text may display differently due to font substitution. |
|
|
Consent Text Box/Sample Consent Form Text |
This is a sample Disclosure agreement and should be replaced by the agreement used by your Financial Institution. Note: When entering new consent text, do not copy and paste from Word; embedded control characters may cause erratic behavior. Use Notepad or type directly into the field.
|
|
|
Notes |
Use this area to leave notes about the Consent. |
|
|
Action Buttons |
|
|
|
Previous Versions |
Click to display any previous versions. They can be viewed and printed, but cannot be modified or deleted. |
This tab allows setting what the user sees and how the signing experience will "flow".
|
|
eSignature Settings Tabs |
Defaults, Consent, Signature Pad, Remote Message Templates, Other Remote Settings. Note: The Remote Message Templates and Other Remote Settings tabs will not be available if the Remote Signature Add-On has not been activated or the evaluation period has expired. |
|
|
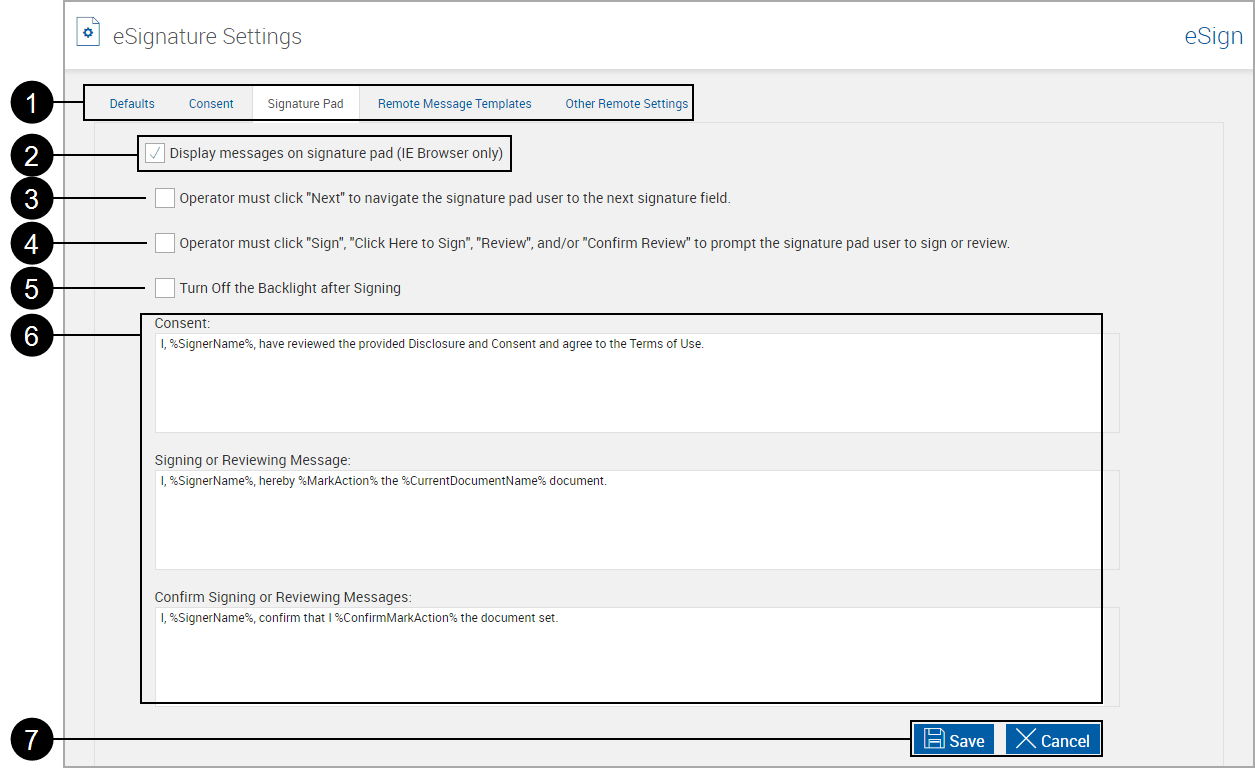
Display messages on the signature pad (IE Browser only) |
When this setting is selected, and a session is processed in Internet Explorer, messages appear on signature pads during the in-person signing process. This method gives signers more control using their signature pads, which results in a faster signing process. Using the signature pad, signers create signatures and initials, accept terms, apply their mark throughout the document set, and confirm completion of the signing process with minimal intervention from the financial institution representative. Refer to Sample Signature Pad Displays for examples When this setting is not selected, messages do not appear on signature pads during the in-person signing process. Instead, the signature pads are blank and are only used to create signatures and initials. Refer to the “Signature Pad without Messages” section of the User Guide for details. This setting only applies to workstations using the Internet Explorer browser to process sessions. |
|
|
Operator must click “Next” to navigate the signature pad user to the next signature field |
When this setting is selected, the operator must click “Next” on the operator’s display to move the signature pad user to the next item. When not selected, the operator/signature pad user will automatically be routed through signing documents. |
|
|
Operator must click “Sign”, “Click Here to Sign”, “Review”, and/or “Confirm Review” to prompt the signature pad user to sign or review |
When this setting is selected, the operator must click prompts to move the signature pad user to the next item. When not selected, the operator/signature pad user will automatically be routed through signing documents. |
|
|
Turn off the backlight after signing |
When this setting is selected, the signature pad backlight will turn off after the signature pad user has completed the signing experience. |
|
|
Consent and Messages |
These are signature pad messages that display for the signer. The following monikers may be used for substitutions:
Note: A Moniker (%SignerName%) is a pre-defined name used to hold a place for data. For example, %SignerName% will be replaced in the signature pad with the name of the signer, as pulled from processed documents. |
|
|
Action Buttons |
|
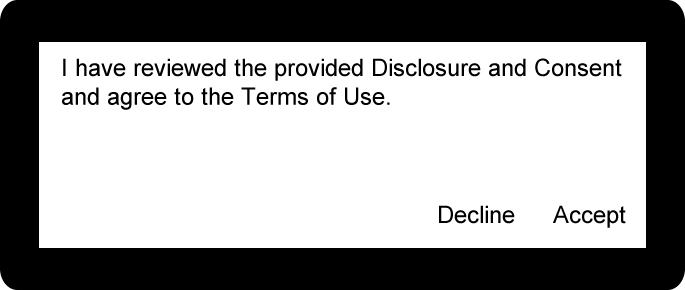
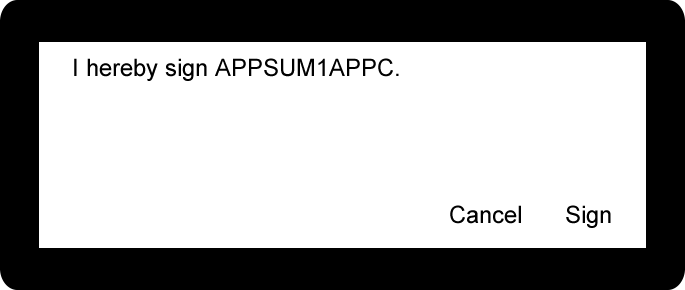
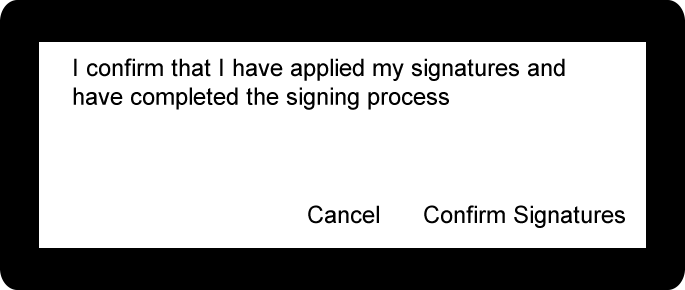
The following example messages appear on the signature pad if the Signature Pad Administration setting Display Messages on Signature Pads is selected. The messages can be modified in the Consent, Signing Message, and Confirm Signatures message fields.
|
Consent:
|
Sign message:
|
|
Confirm Signatures:
|
This tab is used to create multiple, customized message templates which can be modified for the text messages included in email to the session signers and viewers.
This page is unlocked by default.
When completing the fields on this page, do not copy and paste from Word; embedded control characters may cause erratic behavior. Use Notepad or type directly in the field.
Click any template to expand.
|
|
eSignature Settings Tabs |
Defaults, Consent, Signature Pad, Remote Message Templates, Other Remote Settings. Note: The Remote Message Templates and Other Remote Settings tabs will not be available if the Remote Signature Add-On has not been activated or the evaluation period has expired. |
||
|
|
Records Information and Control |
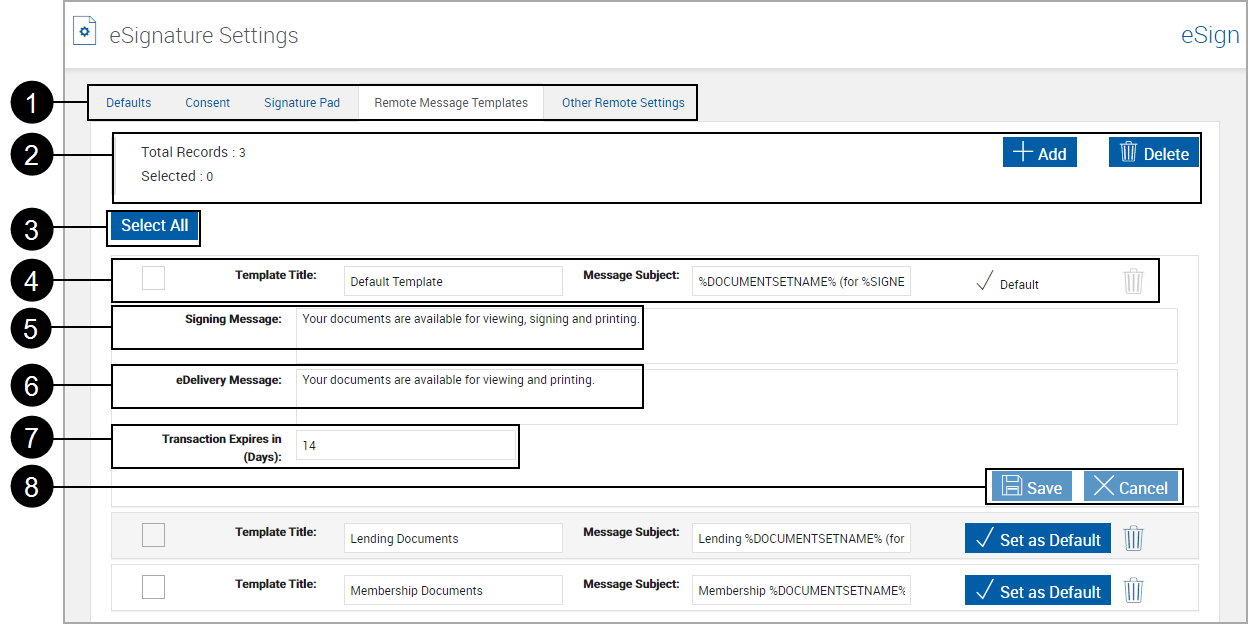
Record Information
Add Message Template button: Click to add a new message template. Delete Message Template button: Click to delete non-default message template selected with the Template Selection Checkbox. In this example the full value is: %DOCUMENTSETNAME% (for %SIGNERNAME%). |
||
|
|
Select All button | Select all non-default message templates for deletion with the Delete Message Template button. | ||
|
|
Template: |
|
||
|
|
Signing Message |
Message sent for documents to be signed.
|
||
|
|
eDelivery Message | Message sent for documents to be viewed only. | ||
|
|
Transaction Expires in (Days) | The number of days a remote signer has for signing a transaction remotely. This setting can be modified when processing documents on the eSignature page. The transaction expires when the time limit is reached. [Range: 1-365, Default: 14] | ||
|
|
Action Buttons |
|
|
|
eSignature Settings Tabs |
Defaults, Consent, Signature Pad, Remote Message Templates, Other Remote Settings. Note: The Remote Message Templates and Other Remote Settings tabs will not be available if the Remote Signature Add-On has not been activated or the evaluation period has expired. |
|
|
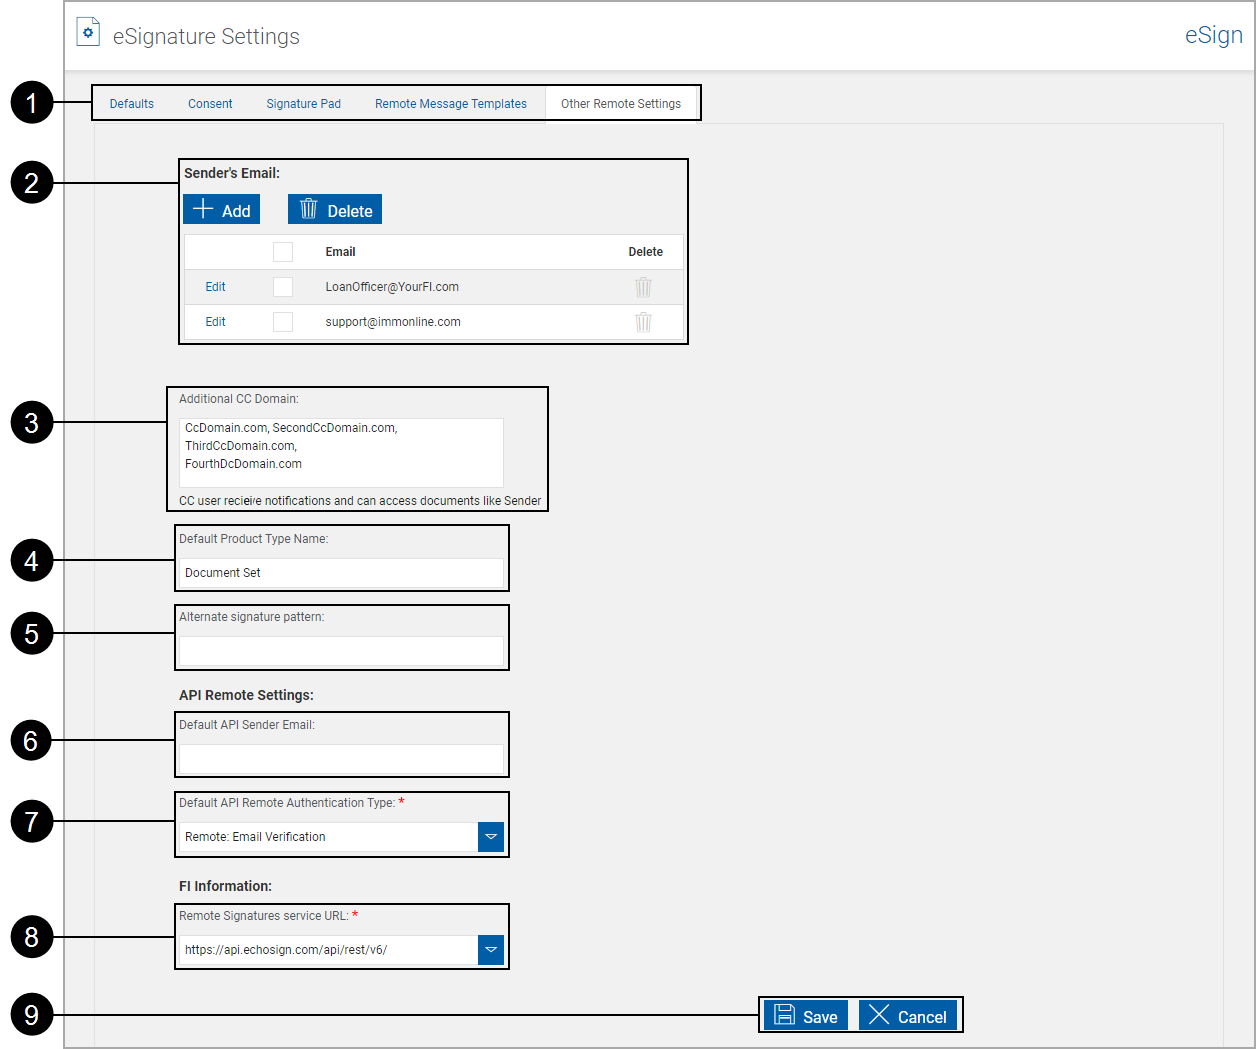
Sender’s Email |
This is the list of available email addresses used when submitting documents to a document delivery system. Refer to Sender's Email for more information. |
|
|
Additional CC Domain |
This allows sending CC sessions to domains other than the Sender's domain. The setting lists all additional CC domains that are allowed on eSignature Management page. The Sender’s email domain is always included in the CC’s email domain and does not have to be entered here. A maximum of 10 domains are allowed, separated by commas or semicolons. |
|
|
If the document set being processed originates from your host, the document set name provided by your host will be sent to the document delivery system. The Default Product Type Name is used when no set name is provided by your host and documents are submitted to Remote Signature. (50 characters maximum) [Refer to Customizing View/Sign Notifications for more information.] |
|
|
|
Alternate Signature Pattern |
Not used in this installation. |
|
|
Default API Sender Email |
Default sender email for API sessions. |
|
|
Default API Remote Authentication Type |
Default Remote Authentication Type for API sessions. Required. |
|
|
Remote Signatures service URL |
Select the URL of the web service to process remote signatures. This setting can be used to change or override the default setting. There are two choices. They can be selected but not edited.
|
|
|
Action Buttons |
|
This is the list of available email addresses used when sending documents to a document delivery system. (These email addresses must be activated with the Remote Signature delivery system and authenticated by each user.)
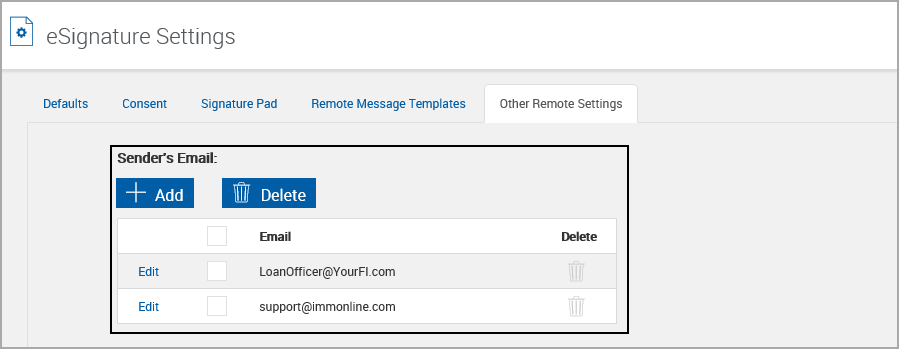
This list can be modified as necessary.
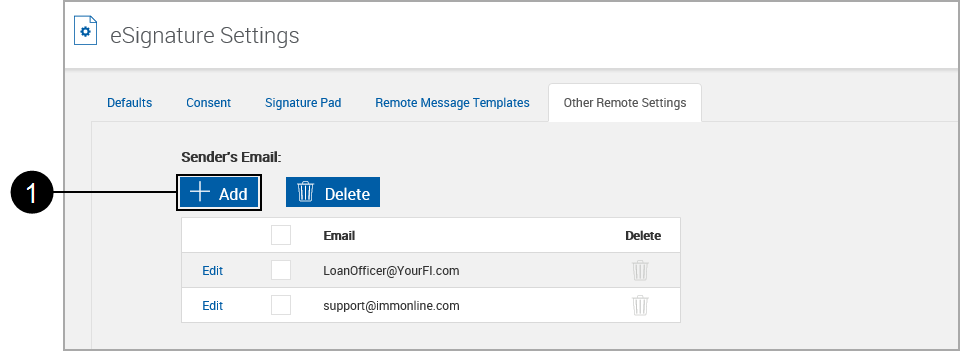
Add Sender's Email

|
Click Add. |
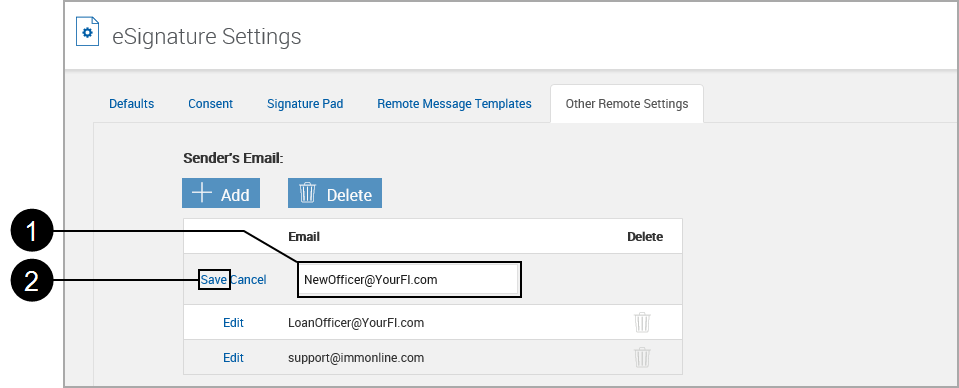

|
Enter the new sender's email. |

|
Click Save. |
The email is added to the list.
Remove Sender's Email
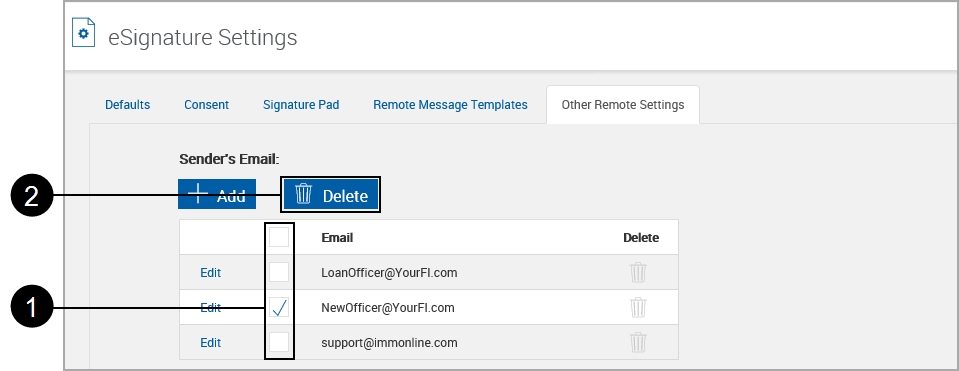

|
Check the box to the left of the one or more email addresses to be deleted or check the box at the top of the column to select all email addresses. |

|
Click Delete. |
A warning box appears.
Click OK to delete.
The email is removed from the list.
Edit Email
Click Edit next to the email.
Make any changes.
Click Save.
The lists refreshes showing the change.
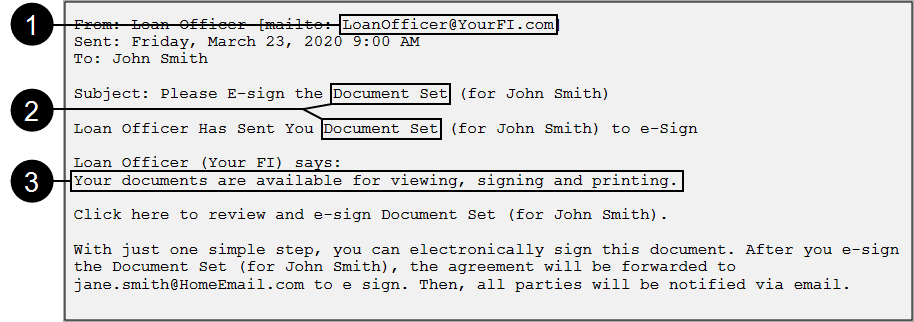
After documents are submitted to be viewed or signed, the document delivery system will contact all parties in the set via email.
You can modify areas of the email sent to inform parties.
Note: Note: This is a plain-text version. Your email system may send mail in a different format.

|
The email address is selectable (Refer to the User Guide, Remote Signatures) and is chosen from Sender's Email. |

|
“Document Set” is used when no document set name is provided in the host data file. Refer to Default Product Type Name. |

|
This portion of the email is customizable. Refer to Remote Message Templates for more information. |


