Icons and Controls
Refer to the following table for more information about eSign icons and controls.
| Icon | Name | Description |
|---|---|---|
|
|
Archive | Documents that can be archived have an Archive icon. The Archive icon will not be displayed if a document has an unsigned or unreviewed field. If the Archive icon is clicked, the document will be archived. |
|
|
Attachment | The Attachment icon identifies attachments. |
|
|
Delete | Click the Delete icon to the right of the document name to delete the document from the session. At least one document must remain on the list. Attachments can be removed. |
|
|
Display / Do Not Display |
Click the icon to toggle the display state of the document. When the Display icon is shown, the document is displayed in PDF format during processing. When the Do Not Display icon is shown, the document is not displayed during processing. This setting is controlled by the Administrator. The default state of this icon is determined when the document is defined. Attached documents with fillable data fields are automatically set to display. Administrators cannot control if attachments are displayed; however, the Retrieved Session Default administrative setting will apply to attached documents with fillable data fields. If the Preserve Original Selection administrative setting is selected, the user’s preference for the display of attachments is remembered. When using the eSignature Management page, these icons have different functionality. Refer to Review / Do Not Show in this table. |
|
|
Document is part of set | The document is part of a group of documents. |
|
|
Email Authentication | When Email Authentication is the selected authentication method for remote signing, the party will receive an email notification. They are instructed to click the Review and sign or Review and accept button to gain access to the documents. If using the Kiosk feature, use the provided URL to gain access to the documents. |
|
|
Government ID | When Government ID is the selected authentication method for remote signing, the party will receive an email notification. They are instructed to click the Review and sign or Review and accept button. If using the Kiosk feature, use the provided URL to begin party authentication. If the signature process is not started on a mobile phone, the party is prompted to enter a phone number. The party must use a smart phone. Then, the party receives a text message containing a link from Adobe Sign. Once the party taps the link, they are asked to capture an image of a government-issued document and to capture an image of themselves. After the government ID and the party’s image are validated, the party gains access to the documents for signing. |
|
|
Export | Export the information to an external file. |
|
|
In Person (Sign) | When In Person is the selected method for signing, the documents will be signed/reviewed in person. |
|
|
KBA | When knowledge-based authentication (KBA) is the selected authentication method for remote signing, the party will receive an email notification. They are instructed to click the Review and sign or Review and accept button. If using the Kiosk feature, use the provided URL to begin party authentication. The party is prompted to enter identity information and answer arbitrary public record questions pertaining to his or her identity. The party’s credit history/report is not accessed or impacted when using the KBA authentication service. |
|
|
Locked |
The Lock icon identifies a session that is locked. Clicking this icon will display the Unlock Session popup, which will provide who locked the session, when it was locked, and the session ID. The ability to unlock a session is controlled by the Administrator. Sessions automatically lock when opened for user activity and become unlocked when a user completes all activity for that session and closes the session or logs out. Sessions may remain locked unexpectedly if the user does not complete the session and closes the browser. To prevent a session from remaining locked, the user should logout after all session-related activity is completed. |
|
|
Merge | Click Merge |
|
|
Number of Documents | The icon displays the number of documents in a group. |
|
|
Open Session | Click to open the Session Details page. |
|
|
Password Authentication | When Password Authentication is the selected authentication method for remote signing, the party will receive an email notification. They are instructed to click the Review and sign or Review and accept button. If using the Kiosk feature, use the provided URL to begin party authentication. The party is then prompted to enter the Shared Secret Password to gain access to the documents for signing. The password must be at least 5 characters. Further password strength and complexity requirements can be adjusted in the FI's Adobe Sign Account Settings. |
|
|
Phone Authentication | When Phone Authentication is the selected authentication method for remote signing, the party will receive an email notification. They are instructed to click the the Review and sign or Review and accept button. If using the Kiosk feature, use the provided URL to begin party authentication. The party is prompted to select the Verification Option (Voice Call or Text Message). A Verification Code will be delivered to the Verification Option method the party selected. The party will enter the Verification Code in the Code field and click OK to gain access to the documents for signing. The supported format is + Country Code followed by a space and the number. |
|
|
Pin / Unpin | When Pin is displayed, the Search Panel is displayed with the Search Results. When Unpin is displayed, the Search Panel is hidden from the Search Results. |
|
|
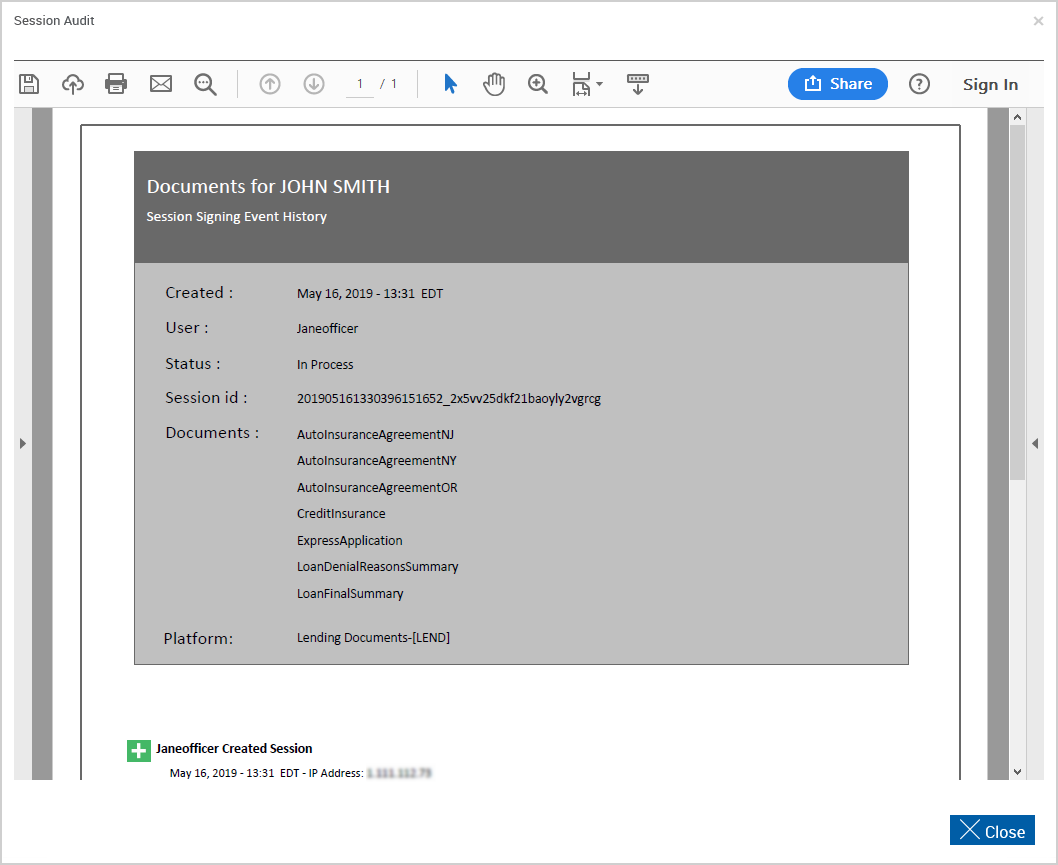
Preview |
Click the Preview icon to view a single document in a PDF popup window. From this window, you can also print the document. Documents cannot be edited in Preview Mode. When the Preview icon is clicked for Session Audit, the Session Audit Report is displayed. This report lists all activities that take place during a session. This report will be archived along with the documents. Click Close to exit the Session Audit PDF.
When the Preview icon is clicked for Document Set, all of the documents in the document set are displayed in one PDF popup. |
|
|
Print documents in their current state. | |
|
|
Reorder | Drag and drop the Reorder icon to change a document's order in the document set. |
|
|
Review / Do Not Show | Click the icon to toggle the state of the document during the signing/reviewing process. When the Review When on a page other than the eSignature Management page, these icons have different functionality. Refer to Display / Do Not Display in this table. |
|
|
Select Document | Add a document by clicking the Select Document button next to the desired document. |
|
|
Select Document Set | Add a document set by clicking the Select Document Set button next to the desired document set. |
|
|
Sign | The Sign icon indicates that a document requires a signature. |
|
|
Single Document | The document is a standalone, single document. |
|
|
Sort By | Click to toggle the sort order to Title Field ASC (ascending order), Title Field DES (descending order), Date Received ASC (ascending order), or Date Received DES (descending order). |
|
|
Transfer | Change session ownership of any selected sessions to another user. |