Adding, Editing, and Deleting Fields
When a document has been selected and opened from the Document Designer page, any of the following fields can be added and defined using the Document Designer. The available Document Designer features and functions are set by an administrator. Some of the features and functions described here may not be applicable to you.
Add signature and initial fields using the Document Designer toolbar. Edit, copy, and delete existing fields by right-clicking on the field. Fields associated with a signer are displayed in the color that is assigned to the signer. For example, John Smith is assigned the color green. All fields associated with him are green. Fields that are not associated with John Smith are black.
Refer to the following procedure to establish a new field or edit an existing field:
- To add a new signature or initial field, drag and drop the Add Signature
 or Add Initial
  icon from the Document Designer toolbar into the document. Alternatively, right-click an existing signature field or initial field, and click Copy to create a new field based on the existing field. Right-click an existing signature or initial field, and click Edit to edit the field.
 - In the Field Details window, adjust the information as necessary.
- Once changes are made, click Save to add the field to the document or update the existing field in the document. Click Cancel to return to the Document Designer page without making any changes. Refer to the following example of a signature field, signature date field, and initial field.
- After the field is placed in the document, move and resize the field as necessary. Refer to Moving and Resizing Fields for details.

|
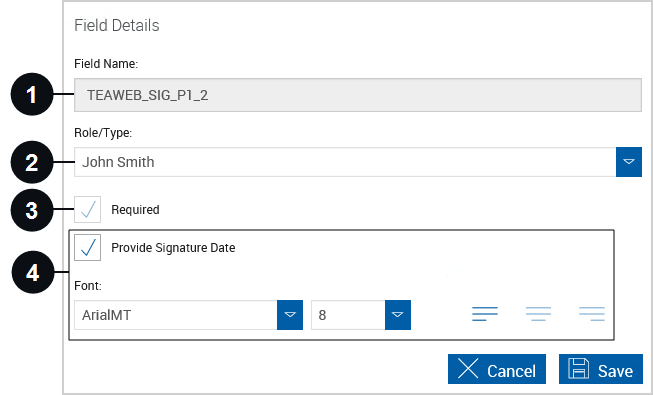
Field Name | The name of the signature or initial field. This is prepopulated and cannot be edited. |

|
Role/Type | The name of the signer. If there are multiple signers, select a signer from the dropdown menu. |

|
Required | When selected, this signature or initial field is required during the signing process. An asterisk means the field is required. |

|
Provide Signature Date | Include a date field with the signature field. The signature date field is placed on the right side of the signature field. Drag and drop the date field to a different location if desired. Use the tools in the Font area to select the font, font size, and text alignment (right, center, left) of the date within the signature date field. This is not applicable to initial fields. |
Add text fields using the Document Designer toolbar. Edit, copy, and delete existing fields by right-clicking on the field. Fields associated with a signer are displayed in the color that is assigned to the signer. For example, John Smith is assigned the color green. All fields associated with him are green. Fields that are not associated with John Smith are black.
Refer to the following procedure to establish a new field or edit an existing field:
- To add a new text field, drag and drop the Add Text Field
 icon from the Document Designer toolbar into the document. Alternatively, right-click an existing text field, and click Copy to create a new field based on the existing field. Right-click an existing text field, and click Edit to edit the field.
 - In the Field Details window, adjust the information as necessary.
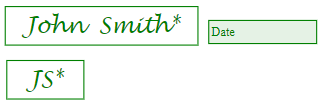
- Employee can edit field until at least one party signed/reviewed: The FI representative can enter and modify data in the field until a signer finishes signing or reviewing the document set.
- Employee can edit field irrespective of signing status: The FI representative can enter and modify data in the field at any time.
- Employee can edit field until below party signs session: The FI representative can enter and modify data in the field until the signer selected in the Choose Party dropdown menu finishes signing or reviewing the document set.
- Employee and selected party can edit until below party signs session: The FI representative and the signer selected in the Choose Party dropdown menu can enter and modify data in the field until the signer finishes signing or reviewing the document set. When Party Must Enter Value is selected, the field must be populated.
- Once changes are made, click Save to add the field to the document or update the existing field in the document. Click Cancel to return to the Document Designer page without making any changes. Refer to the following example of a text field.
- After the field is placed, move and resize the field as necessary. Refer to Moving and Resizing Fields for details.
|
|
Field Name | The name of the text field. This is prepopulated but can be edited. The default is TEXTFIELD_Number. Alphanumeric characters and underscores are supported. |
|
|
Tool Tip | A message that is displayed when a cursor is positioned over the field. |
|
|
Unlock Options |
Determine who can enter and modify data in the text field and when they are allowed to do so: The Choose Party dropdown menu and Party Must Enter Value checkbox are not available for all unlock options. |
|
|
Default Value | The value displayed in the text field. The field can be left blank. |
|
|
Font |
Use the tools in the Font area to select the font, font size, and alignment (right, center, left) of the text within the text field. |

Add checkbox fields using the Document Designer toolbar. Edit, copy, and delete existing fields by right-clicking on the field. Fields associated with a signer are displayed in the color that is assigned to the signer. For example, John Smith is assigned the color green. All fields associated with him are green. Fields that are not associated with John Smith are black.
Refer to the following procedure to establish a new field or edit an existing field:
- To add a new checkbox, drag and drop the Add Checkbox
 icon from the Document Designer toolbar into the document. Alternatively, right-click an existing checkbox, and click Copy to create a new field based on the existing field. Right-click an existing checkbox, and click Edit to edit the field.
 - In the Field Details window, adjust the information as necessary.
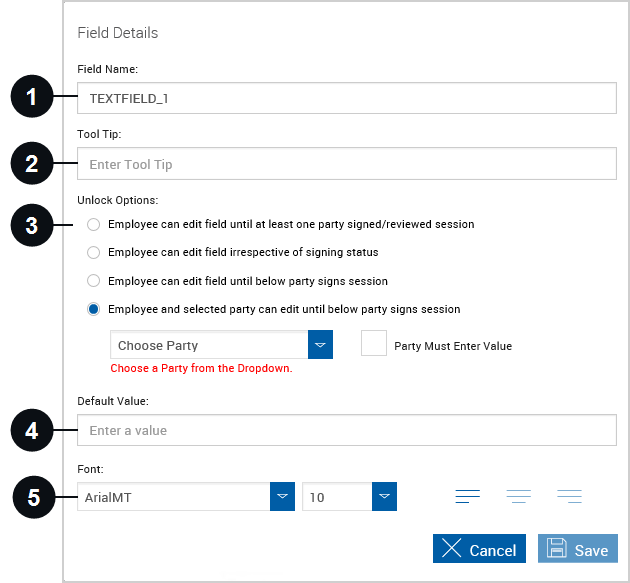
- Employee can edit field until at least one party signed/reviewed: The FI representative can select the field until a signer finishes signing or reviewing the document set.
- Employee can edit field irrespective of signing status: The FI representative can select the field at any time.
- Employee can edit field until below party signs session: The FI representative can select the field until the signer selected in the Choose Party dropdown menu finishes signing or reviewing the document set.
- Employee and selected party can edit until below party signs session: The FI representative and the signer selected in the Choose Party dropdown menu can select the field until the signer finishes signing or reviewing the document set.
- Once changes are made, click Save to add the field to the document or update the existing field in the document. Click Cancel to return to the Document Designer page without making any changes. Refer to the following example of a checkbox with a caption.
- After the field is placed, move and resize the field as necessary. Refer to Moving and Resizing Fields for details.
|
|
Field Name | The name of the checkbox. This is prepopulated but can be edited. The default is CHECKBOX_Number. Alphanumeric characters and underscores are supported. |
|
|
Tool Tip | A message that is displayed when a cursor is positioned over the field. |
|
|
Unlock Options |
Determine who can select the checkbox and when they are allowed to do so: The Choose Party dropdown menu is not available for all unlock options. |
|
|
Default Value | Determine whether the checkbox is selected or not selected by default. |
|
|
Caption | Create a caption for the field. After the field information has been saved, the caption region can be moved and resized as necessary. |
|
|
Font |
Use the tools in the Font area to select the font, font size, and alignment (right, center, left) of the text within the caption. |
Add dropdown fields using the Document Designer toolbar. Edit, copy, and delete existing fields by right-clicking on the field. Fields associated with a signer are displayed in the color that is assigned to the signer. For example, John Smith is assigned the color green. All fields associated with him are green. Fields that are not associated with John Smith are black.
Refer to the following procedure to establish a new field or edit an existing field:
- To add a new dropdown field, drag and drop the Add Dropdown
 icon from the Document Designer toolbar into the document. Alternatively, right-click an existing dropdown field, and click Copy to create a new field based on the existing field. Right-click an existing dropdown field, and click Edit to edit the field.
 -
In the Field Details window, adjust the information as necessary.
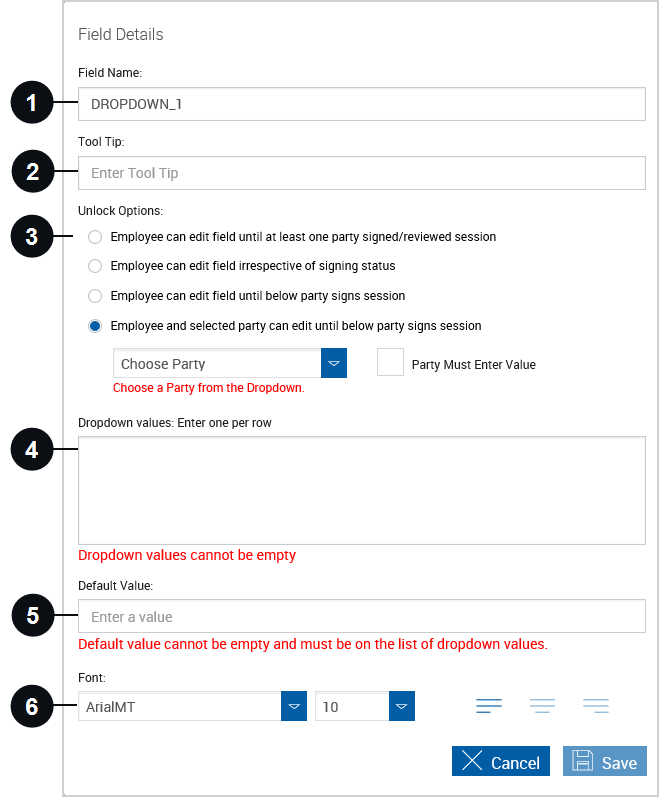
Field Name The name of the dropdown field. This is prepopulated but can be edited. The default is DROPDOWN_Number. Alphanumeric characters and underscores are supported.
Tool Tip A message that is displayed when a cursor is positioned over the field.
Unlock Options Determine who can select a value from the dropdown field and when they are allowed to do so:
- Employee can edit field until at least one party signed/reviewed: The FI representative can select a value from the dropdown field until a signer finishes signing or reviewing the document set.
- Employee can edit field irrespective of signing status: The FI representative can select a value from the dropdown field at any time.
- Employee can edit field until below party signs session: The FI representative can select a value from the dropdown field until the signer selected in the Choose Party dropdown menu finishes signing or reviewing the document set.
- Employee and selected party can edit until below party signs session: The FI representative and the signer selected in the Choose Party dropdown menu can select a value from the dropdown field until the signer finishes signing or reviewing the document set. When Party Must Enter Value is selected, the field must be populated.
The Choose Party dropdown menu and Party Must Enter Value checkbox are not available for all unlock options.
Dropdown Values Values in the dropdown menu. Enter one per row. 
Default Value Determine the default value of the dropdown menu based on the dropdown values. 
Font
Use the tools in the Font area to select the font, font size, and alignment (right, center, left) of the text within the dropdown field.
- Once changes are made, click Save to add the field to the document or update the existing field in the document. Click Cancel to return to the Document Designer page without making any changes. Refer to the following example of a dropdown menu.
- After the field is placed, move and resize the field as necessary. Refer to Moving and Resizing Fields for details.

Add radio buttons using the Document Designer toolbar. Edit, copy, and delete radio buttons by right-clicking on the field. Fields associated with a signer are displayed in the color that is assigned to the signer. For example, John Smith is assigned the color green. All fields associated with him are green. Fields that are not associated with John Smith are black.
Refer to the following procedure to establish a new field or edit an existing field:
- To add new radio buttons, drag and drop the Add Radio Button
 icon from the Document Designer toolbar into the document. Alternatively, right-click an existing radio button, and click Copy to create a new field based on the existing field. Right-click an existing radio button, and click Edit to edit the field.
 -
In the Field Details window, adjust the information as necessary.
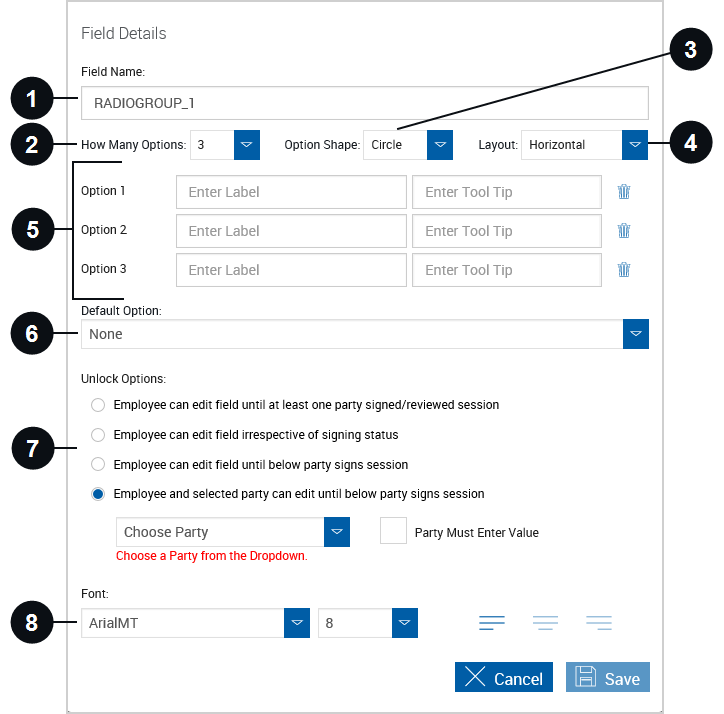
Field Name The name of the radio button group. This is prepopulated but can be edited. The default is RADIOGROUP_Number. Alphanumeric characters and underscores are supported.
How Many Options Select the number of radio buttons that are included in the group. The minimum and default value is 2. The maximum value is 20.
Option Shape
Select the shape of the radio button: circle or square. Circle is the default.
Layout Select the layout of the radio buttons: horizontal or vertical. Horizontal is the default.
Options
Provide a label for each radio button (optional). In the Tool Tip field, enter a message that is displayed when a cursor is positioned over the field if desired. Click the Delete icon to remove a radio button and automatically update the How Many Options field.
Default Option
Determine which radio button in the group is selected by default. If None is selected, no radio button is selected by default.

Unlock Options Determine who can select a radio button and when they are allowed to do so:
- Employee can edit field until at least one party signed/reviewed: The FI representative can select a value until a signer finishes signing or reviewing the document set.
- Employee can edit field irrespective of signing status: The FI representative can select a value at any time.
- Employee can edit field until below party signs session: The FI representative can select a value until the signer selected in the Choose Party dropdown menu finishes signing or reviewing the document set.
- Employee and selected party can edit until below party signs session: The FI representative and the signer selected in the Choose Party dropdown menu can select a value until the signer finishes signing or reviewing the document set. When Party Must Enter Value is selected, the field must be populated.
The Choose Party dropdown menu and Party Must Enter Value checkbox are not available for all unlock options.

Font
Use the tools in the Font area to select the font, font size, and alignment (right, center, left) of the text within the radio button label.
- Once changes are made, click Save to add the field to the document or update the existing field in the document. Click Cancel to return to the Document Designer page without making any changes. Refer to the following example of a radio button group.
- After the field is placed, move and resize the field as necessary. Refer to Moving and Resizing Fields for details.
