Design or Edit Document Templates / Define Unknown Documents
This procedure is used by the FI Administrator and Document Administrator to design templates for use in signing.
A Document Template contains Party names, signature locations, initial locations, dates of signing, indexes information and more.
|
Note: |
This page may not display for your installation depending on permissions set by the Administrator. Fonts used when defining fields and regions on this page are fonts used by the defining workstation. If the viewing workstation does not have the same fonts, the fields and regions may display with different fonts. |
|
Stop: |
The Source PDF should not contain actual customer or private information. Processing sessions that contain partial documents, such as submitting one page of a two-page document, may result in an error. If an error occurs when submitting partial documents to eSign, click Delete and contact your administrator.
|

The Define Document Template (RTS) procedure for a new document is the same as defining an Unknown document.
After clicking Design Template, the New Template page appears.
When an eSign user processes a session with Unknown documents, the eSign user will be directed to the Collected Documents page, where they can click on a link to define the template.
We'll discuss:
- New Template Page
- Collected Documents Page
- Defining a Document Type - This must be done first for all new document templates. The remaining steps can be performed in any order.
-
Add Index - Loads indexes from XML files associated with a template. This feature may not be functional for your installation.
- Defining FI Level Index Field Regions - Index fields are used in creating file names for processed documents and document sets. Indexes are necessary for your imaging system to successfully archive your document.
- Defining Party Information
- Defining Text Box Fields
- Defining Check Box Fields
- Defining Drop Down Fields
- Defining Radio Button Fields
- Defining Signature Fields
- Defining Initial Fields
- Alignment Options
New Template Page
Page Help provides a quick listing of icons and functions available and related to the New Template page (RTS).
Click the Page Help icon.
 with Help popup")
Refer Template Manager Screen Layout to for a listing of icons and definitions.
New Template Screen Layout

|
|
Action Button:
|
|
|
Message center: Displays instructions, messages and feedback for the user. |
|
|
Browse / Drag and Drop Area: Drop a PDF document in this area or click to select a location and PDF document. Multiple documents can be added at the same time. Each document has to be defined before it can be processed in a session. |
|
|
Available Documents: Lists documents waiting to be defined as templates. Documents will remain in queue until being converted or deleted. The following information will display after a document has been loaded: |

|
Document Name: Displays the document name as "Unknown (Document Name)". The extension does not display. The document name can be modified during the template definition process. |

|
Preview icon: View the document in a separate PDF window. |

|
Delete icon: Remove the document from the Available Documents list. |

|
Open Template Manager icon: Continue the template definition process. |

Collected Documents Page
Refer to Collected Documents Page for more information. This page may not display for your installation.

|
|
Action Buttons:
|
|
|
Message center: Displays instructions, messages and feedback for the user. |
|
|
Add Documents Browse/Drag and Drop Area: Drop a PDF document in this area or click to select a location and PDF document. |
|
|
Delete All: Deletes all documents listed. You will be prompted to confirm. |
|
|
Selected Documents: The Selected Documents section contains all of the documents that have been chosen as part of a document set, including unknown documents. Unknown documents must be defined before they can be fully included when processing the document set. The following information will display after a document has been loaded: |
|
|
Reorder: Drag and drop the Reorder icon to change a document's order in the document set. |
|
|
Document Name: The name of the document is displayed here. Unknown documents will display "Unknown" and the file name without extension. |
|
|
Preview icon: View the document in a separate PDF window. |
|
|
Delete icon: Delete the document from the Available Documents list. |
|
|
Open Template Manager icon: Continue the template definition process. Previously defined documents cannot be edited from this page. |


To continue, click Open Template Manager.
New Template

Collected Documents

The Template Manager page appears and displays the selected document. At this point, only the Cancel, Define Document, Zoom In and Zoom Out icons are enabled.

Refer to Template Manager for a listing of functions and controls on the Template Manager page.
The document’s unique name is used to locate and archive the document.
Index fields are used in creating file names for processed documents and document sets.
Additional fields are used to extract additional information from the document.
These procedures will discuss defining document information for new documents. Refer to Export and Import Defined RTS (Document) Templates information on modifying previously defined document templates.
Static Documents, Dynamic Documents and Image-Based Documents
What’s the difference?
Static Documents
Static documents will always be the same length or number of pages and the layout is fixed and non-variable. All information in static documents will always be located in the same regions. The Signature Field and Signature Date Field will always be in the same locations on the same page.
Dynamic Documents
Dynamic documents can vary in the number of pages included. Mortgage documents can be one page in some cases and nine or more in other cases. Typically, these documents require that an applicant read the information and then sign the documents at the end, attesting that the applicant has read the required information. In dynamic documents the Signature Field and Signature Date field can be anywhere in the document regardless of the number of pages included. Document or template information should still be in a fixed location for eSign to extract the data.
Dynamic documents do not allow adding party information, initials fields or signature fields when a document is defined.
Note: Changing document type (dynamic vs. static) after the document has been defined is not supported. If you need to change the document type, delete the Template Definition and re-define.
Image-Based Documents
Image-based documents are a special type of PDF document that consists entirely of an image. Text displayed is actually composed of graphic images - there is no character-based text. A Dynamic Document cannot be defined as an image-based document. The areas to be defined (index and party information) must contain graphic information, such as graphical representations of characters - areas to be defined cannot be empty.
Click the Define Document icon.

The mouse cursor changes.
Drag and drop the mouse over the region of the document that contains text information unique to that document. In this case the title is Application Summary, but we have used a unique form number for the document.
If the region you are defining is very close to other regions on the page, use the Zoom In function so you can more accurately highlight only the region you need.
If this is an image-based document, the full region must be defined. Image information under the region borders will not be translated correctly.

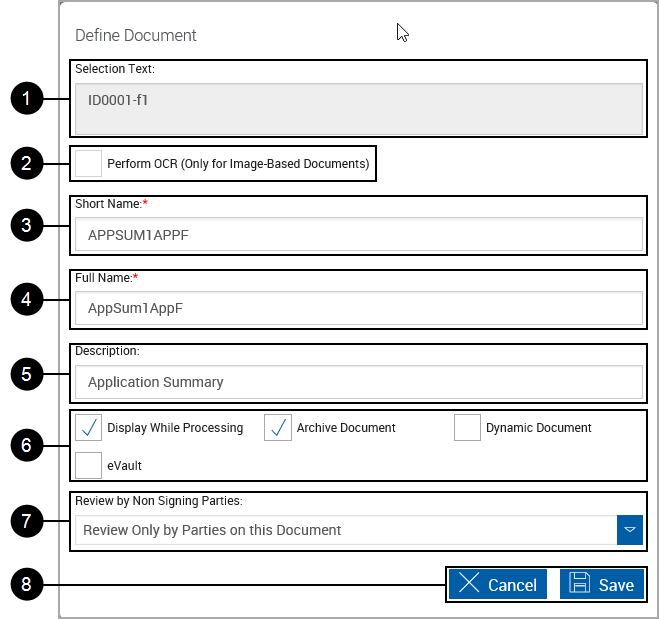
The Define Document page appears.

|
|
Selection Text: All highlighted text from the previous step will appear in the Selection Text region. |
||
|
|
Perform OCR (Only for Image-Based Documents): When checked, the document is processed as an image-based document. To function correctly, there can be no text within the document. Index and party information areas are defined in the same manner as static documents, but they must contain graphic information, such as graphical representations of characters. This feature must be enabled by the HostAdmin at the FI level.
|
||
|
|
Short Name: Used in creating the file name for saved sessions. (20 characters maximum) Note: Short Name can only have A-Z, a-z, 1-9, Dash (-), and Underscore (_). Spaces are not allowed. |
||
|
|
Full Name: Used in creating the file name for archived documents and indexing. The Full Name defaults to the current file name, but can be modified. (100 characters maximum) Note: Full Name can only have A-Z, a-z, 1-9, Dash (-), and Underscore (_). Spaces are not allowed. |
||
|
|
Description: Used on the Saved Session Details screen for the Document Description column. An easy to recognize description of the document. (150 characters maximum) |
||
|
|
Processing Choices:
|
||
|
|
Default Action for Non-Signing Parties:
|
||
|
|
Action Buttons:
|
Click OK to continue.
Completed Document Definition (Static, Non-OCR)
After clicking Save, the document Template Manager refreshes.
- The defined document ID area is highlighted.
- The document name displays in the Defined Field List and browser page title.
- Additional icons become active.

|
Note: |
This button may not be used for your installation. |
Loads indexes from XML files associated with a template. When an existing document template is edited, this button will appear.

Click to upload an XML file specific to this document.
Index fields are used in creating file names for processed documents and document sets. Indexes are necessary for your imaging system to successfully archive your document.
Index Fields can also be used in routing documents through workflows.
Define Index Type
Click the Add Index icon.

The mouse cursor changes.
Drag and drop the mouse over the region of the document that will contain the information you are indexing.
If this is an image-based document, the full region must be defined. Image information under the region borders will not be translated correctly.

The Extraction Details screen appears.

|
|
Selection Text:
|
|
|
Index Type: Select the Index Type from the drop-down list. Refer to Index Fields Maintenance for information on defining Index Types. |
|
|
Action Buttons:
|
After clicking Save, the Template Manager refreshes. The region is highlighted and the name displays in the Defined Field List.
The Add Index icon will remain selected to allow adding additional index fields without having to select the icon.
Stop: Existing index fields cannot be edited or deleted until the Add Index icon is deselected.
Repeat these steps as many times as necessary to define the index field type regions within each document.
Edit Index Field
Click on the Edit icon next to the index name, or right-click on the defined index region and select Edit from the pop-up choices.
Stop: Existing index fields cannot be edited or deleted until the Add Index icon is deselected.

Index Field regions cannot be repositioned. The region must be deleted and redefined instead.
Delete Index Field
Deleting a defined index and region from the current document does not delete the index field from the database. Refer to Index Fields Maintenance for information on deleting Index Types.
Stop: Existing index fields cannot be edited or deleted until the Add Index icon is deselected.
Right-click on the defined index region and select Delete from the pop-up choices.

What's a Party?
No hats or noisemakers. For our purposes, a Party is a person. Documents may have one or more parties included. Party fields are used throughout IMM eSign.
If you are processing a document that contains information for more than one person, then the first person listed would be Party 1. The next person listed will be Party 2. Additional people will be Party 3, 4, etc.
Party 1?
In the case of a loan application that will be submitted for a digitized signature online, the first person listed (Primary Applicant) would be Party 1. Any co-applicants would be Party 2, 3, etc. Some loan applications only have room for 1 or 2 applicants, so an additional loan application may need to be submitted with only the remaining party information. Other documents may be submitted that only contain information related to a single party.
| Complete in Order When using Remote Signatures and the document set is submitted for digitized signatures, Party 1 has to sign the document first, before Party 2 receives the document set for signing. Party 3 will only receive the document set after Party 1 and Party 2 have signed the documents. All parties will receive notifications to view/sign at the same time. All parties will be allowed to view/sign at the same time. |
Party Name (Party 1, Party 2, etc.) definitions are used to associate other related fields together. Signature Fields for Party 1, Address Fields for Party 1, etc. – all will be associated with the Party 1 Name Field.
|
Note: |
Party fields will be used to populate the Remote Signature screen. Regions used for Index Fields can also be used for Party information. Defined Party Field regions and Index Field regions can overlap. Only the following Party fields are required for processing documents with signature blocks:
Additional fields in examples are not required to be defined. |
Click the Add Party Info icon.
Note: The Add Party Info icon remains active until deselected.

The mouse cursor changes.
Drag and drop the mouse over the region of the document that will contain the information you are defining.
If the region you are highlighting is very close to other regions on the page, use the Zoom In function so you can more accurately highlight only the region you need.
If this is an image-based document, the full region must be defined. Image information under the region borders will not be translated correctly.

Note: Regions used for Index Fields can also be used for Party information. Defined Party Field regions and Index Field regions can overlap.
The Extraction Details screen appears, which allows the administrator to select the party and select the information with an appropriate field name.
This information will be used to populate the fields during the signing experience.
Documents in Remote Signature are chained together based on the name of the applicant.

|
|
Selection Text:
|
|
|
Who does this information belong to?: Select the associated party from the drop-down list. Party regions will be color coded by Party Number selection. Up to 25 parties per document can be defined. |
|
|
Select the type of extraction: Select the party field for the highlighted area. For a party, either Full Name or Last Name and First Name must be defined first. This example will use Full Name. Select Full Name from the drop-down list. |
|
|
Action Buttons:
|
The Party Information appears, and the defined region is highlighted in the document.
Party Information fields cannot be moved or sized after creation. The must be deleted and redefined.
There are two email fields available for party definitions – Home Email and Work Email. The same procedure is used for both fields.
Let’s define the Home Email (Address) for Party 1.
Click the Add Party Info icon (only if the Add Party Info icon is not previously active).
Note: The Add Party Info icon remains active until deselected.

The mouse cursor changes.
Drag and drop the mouse over the region of the document that will contain the information you are defining.
If the region you are highlighting is very close to other regions on the page, use the Zoom In function so you can more accurately highlight only the region you need.
If this is an image-based document, the full region must be defined. Image information under the region borders will not be translated correctly.

Note: Party Fields can overlap Index Fields.
The Extraction Details screen appears, which allows the administrator to select the party and select the information with an appropriate field name.
This information will be used to populate the fields in the Remote Signature screen.

|
|
Selection Text:
|
|
|
Who does this information belong to?: Select the associated party from the drop-down list. Party regions will be color coded by Party Number selection. Up to 25 parties per document can be defined. Since we just defined Full Name for Party 1, Party 1 remains selected. |
|
|
Select the type of extraction: Select the party field for the highlighted area. Select Home Email from the drop-down list. |
|
|
Action Buttons:
|
The Party Information appears, and the defined region is highlighted in the document.

Let's define the Name for Party 2.
Click the Define Party icon. Note: Note: The Add Party icon remains active until deselected.

The mouse cursor changes.
Drag and drop the mouse over the region of the document that will contain the information you are defining.
If the region you are highlighting is very close to other regions on the page, use the Zoom In function so you can more accurately highlight only the region you need.
If this is an image-based document, the full region must be defined. Image information under the region borders will not be translated correctly.

Note: Party Fields can overlap Index Fields.
The Extraction Details screen appears, which allows the administrator to select the party and select the information with an appropriate field name.
This information will be used to populate the fields in the Remote Signature screen.

|
|
Selection Text:
Note: The regions should fully enclose all image-based characters to be used - characters under the bounding box will not be part of the region. |
|
|
Who does this information belong to?: Select the associated party from the drop-down list. Party regions will be color coded by Party Number selection. Up to 25 parties per document can be defined. |
|
|
Select the type of extraction: Select the party field for the highlighted area. For a party, either Full Name or Last Name and First Name must be defined first. This example will use Full Name. Select Full Name from the drop-down list. |
|
|
Action Buttons:
|

Repeat these steps as many times as necessary to add all party-related field definitions to the document.
Drag and drop the Text Box bounding box to a location in the document.

After defining the region, the Field Details pop-up appears.
Use Field Details to define additional information for the text box.
|
Default Text Box Field Details
|
Updated Text Box Field Details
|


|
|
Field Name: The name of the field. |

|
Index Field: When checked, allows associating the value of this field with any unassigned index field. When checked, Role/Type will default to Always Locked. |

|
Tool Tip: A descriptive explanation of the field. When checked, allows associating the value of this field with any unassigned index field. When checked, Role/Type will default to Always Locked. |
|
|
Unlock Options: The Role/Type of this field when processed through eSign RTS. Enables or disables the field based on the role of the signer.
|
|
|
Default Value: The default value used if no information is input during processing. |
|
|
Font Information: The Font Information can be altered to change the Font Name, Font Size and Alignment. Note: Fonts selected will display when the document is displayed during the signing process. |
|
|
Action Buttons:
|
After saving changes, the field appears and the defined region is highlighted in the document, and
can moved or resized with the mouse.
|
Moving a Text Box
|
Resizing a Text Box
|


Repeat these steps as many times as necessary to design additional fields.
Drag and drop the Check Box bounding box to a location in the document.

After placing a check box in the document, the Field Details pop-up appears.
Use Field Details to define additional information for the check box.
|
Default Check Box Field Details
|
Updated Check Box Field Details
|


|
|
Field Name: The name of the field. |
|
|
Tool Tip: A descriptive explanation of the field. |
|
|
Unlock Options: The Role/Type of this field when processed through eSign RTS. Enables or disables the field based on the role of the signer.
|
|
|
Default Value: The default value used if no information is input during processing. |
|
|
Caption: A brief description of the field. |
|
|
Font Information: The Font Information can be altered to change the Font Name, Font Size and Alignment. Note: Fonts selected will display when the document is displayed during the signing process. |
|
|
Action Buttons:
|
After saving changes, the field appears and the defined region is highlighted in the document.
After defining the field, use your mouse to Drag and drop the field as necessary. The field can also be resized using the mouse.
Drag and drop the Drop Down bounding box to a location in the document.

After defining the region, the Field Details pop-up appears.
Use Field Details to define additional information for the drop down.
|
Default Drop Down Field Details
|
Updated Drop Down Field Details
|


|
|
Field Name: The name of the field. |
|
|
Tool Tip: A descriptive explanation of the field. |
|
|
Unlock Options: The Role/Type of this field when processed through eSign RTS. Enables or disables the field based on the role of the signer.
|
|
|
Dropdown Values: The choices presented during processing. |
|
|
Default Value: Default choice to display. |
|
|
Font : The Font Information can be altered to change the Font Name, Font Size and Alignment. Note: Fonts selected will display when the document is displayed during the signing process. |
|
|
Action Buttons:
|
After saving changes, the field appears and the defined region is highlighted in the document.
After defining the field, use your mouse to Drag and drop the field as necessary. The field can also be resized using the mouse.
Radio buttons allow choosing only one of a predefined set of mutually exclusive options. The values of the options must be added when they are created.
Drag and drop the Radio Button bounding box to a location in the document.

After defining the region, the Field Details pop-up appears.
Use Field Details to define additional information for the radio buttons.
|
Default Radio Button Field Details
|
Updated Radio Button Field Details
|


|
|
Field Name: The name of the field. |
|
|
Options Choices: Radio button choices
Tool Tip: A descriptive explanation of the field. |
|
|
Options Values: Displays defined radio button labels and tool tips. |

|
Default Option: Radio button that is initially selected. |
|
|
Unlock Options: The Role/Type of this field when processed through eSign RTS. Enables or disables the field based on the role of the signer.
|
|
|
Font: The Font Information can be altered to change the Font Name, Font Size and Alignment. Note: Fonts selected will display when the document is displayed during the signing process. |
|
|
Action Buttons:
|
After saving changes, the field appears and the defined region is highlighted in the document.
After defining the field, use your mouse to Drag and drop the field as necessary. The field can also be resized using the mouse.
Signature fields are used to store signatures within a document and session.
Drag and drop the Signature bounding box to a location in the document.

After defining the region, the Field Details pop-up appears.
Use Field Details to define additional information for the signature field.
|
Default Signature Field Details
|

|
|
Field Name: The field name cannot be changed for Signature Fields. |
|
|
Role/Type: The Role/Type of this field when processed through eSign RTS. Enables or disables the field based on the role of the signer.
|
|
|
Required: When selected the signer must sign the document during the Signing Experience. |
|
|
Provide Signature Date: Select to place a date field to the right of the Signature Field. Refer to Defining Signature Date Field. |
|
|
Action Buttons:
|
After saving changes, the field appears and the defined region is highlighted in the document.
After defining the field, use your mouse to Drag and drop the field as necessary. The field can also be resized using the mouse.
Defining Signature Date Field
This field displays and records the date the document was signed by the related party.
After selecting the Provide Signature Date for the signature field, the field will be placed to the right of the signature field by default.
Right click on the Date field and select Edit.
Use Field Details to define additional information for the Signature Date.
|
Signature Date Field Details
|

|
|
Field Name: The field name cannot be changed for Signature Fields. |
|
|
Role/Type: The Role/Type of this field when processed through eSign RTS. This will enable or disable the field based on the role of the signer.
|
|
|
Provide Signature Date: Select to place a date field to the right of the Signature Field. Refer to Defining Signature Date Field. |
|
|
Required: When selected the signer must sign the document during the Signing Experience. |
|
|
Font: The Font Information can be altered to change the Font Name, Font Size and Alignment. Note: Fonts selected will display when the document is displayed during the signing process. |
|
|
Action Buttons:
|
After saving changes, the field appears and the defined region is highlighted in the document. The Signature Date will not be displayed in the Fields List. It can be edited by right-clicking the field and selecting Edit.
After defining the field, use your mouse to Drag and drop the field as necessary. The field can also be resized using the mouse.
Initial fields allow the signer to acknowledge specific areas of the document.
Drag and drop the Initial bounding box to a location in the document.

After defining the region, the Field Details pop-up appears.
Use Field Details to define additional information for the text box.
|
Initials Field Details
|

|
|
Field Name: The field name cannot be changed for Initials Fields. |
|
|
Role/Type: The Role/Type of this field when processed through eSign RTS. Enables or disables the field based on the role of the signer.
|
|
|
Required: When selected the signer must initial the document during the Signing Experience. |
|
|
Action Buttons:
|
After saving changes, the field appears and the defined region is highlighted in the document.
After defining the field, use your mouse to Drag and drop the field as necessary. The field can also be resized using the mouse.
There are multiple options which can be used to align fields on the document. Only fields can be aligned; Document Name, Index Fields and Party Information (Full Name, Work Email, etc.) cannot be aligned using the alignment options.
Alignment options cannot be used unless two or more field items are selected.
Click an item. The first item selected will be the considered the primary alignment object. All additional items will be aligned to the primary alignment object.
Control-click to select additional objects.
|
|
Align Left: Left-align two or more elements. All items selected will align to the first field element chosen. |
|
|
Align Right: Right-align two or more elements. All elements selected will align to the first field element chosen. |
|
|
Align Center: Center-align two or more elements. All elements selected will align to the first field element chosen. |
|
|
Align Top: Top-align two or more elements. All elements selected will align to the first field element chosen. |
|
|
Align Middle: Middle-align two or more field items. All elements selected will align to the first field element chosen. |
|
|
Align Bottom: Bottom-align two or more field items. All items selected will align to the first field item chosen. |
|
|
Match Width: Size two or more elements to the same width. All elements selected will size to the first element chosen. |
|
|
Match Height: Size two or more elements to the same height. All elements selected will size to the first element chosen. |


Zoom In/Out and Snap Options
|
|
Zoom Buttons: Zoom in to precisely place elements. Zoom out to see more of the document. |
|
|
Snap Lines: Move and align elements with boundaries and center lines of other elements. To use Snap Lines, first click the snap lines icon and then drag the object on the canvas . When the object moves closer to other objects, the guide lines will display automatically. Note that the type of line displayed- Vertical or Horizontal /both lines will depend on the object orientation nearby. Once the object has been dropped, the guideline will disappear automatically. To re-align again, the process must be repeated. |


