Collected Documents Page
From the Collected Documents page, add documents, attachments, photos, and scanned items. Then, add the files to an existing session or use them to create a new session. Documents can be added to a partially signed existing session if the document being added does not require the signature of someone that has completed signing.
Note: This page may not display for your installation.
Note: Depending on your version of eSign, the Collected Documents page examples shown here might look different than your Collected Documents page. Some features and functions described and shown here may not be applicable to you.
Note: The features and functions available to you on this page are set by the administrator. Some of the features and functions described and shown here may not be applicable to you.
Note: The maximum number of pages allowed for a document is 50 pages. It is not recommended to use PDFs with large color images on each page. Doing so will result in performance issues.
Note: If an error occurs when submitting documents to eSign, click Delete and contact your administrator. 
Note: If documents are printed or saved to the eSign Client input folders while the eSign browser is open, simply click Refresh to display the most up-to-date documents on the Collected Documents page.
Note: Depending on the method used to access the Collected Documents page, the Add Documents area may be expanded or collapsed. Click Pin ![]() to collapse the Add Documents area. Click Unpin
to collapse the Add Documents area. Click Unpin ![]() to expand the Add Documents area.
to expand the Add Documents area.
Note: Click the Page Help  icon for a list of icons and functions available on the page.
There are multiple ways to access the Collected Documents page:
- When documents are printed or saved to the eSign Client input folders, the eSign browser is automatically launched and displays the uploaded documents on the Collected Documents page. Refer to When the page is automatically launched for details.
- Manually launch the Collected Documents page from the eSign Client
 icon > Show Documents. Refer to When the page is launched from the eSign Client icon for details.
 - Manually launch the Collected Documents page from the Processing > Collected Documents menu. Refer to When the page is launched from the Processing > Collected Documents menu for details.
- Launch the Collected Documents page from the Session Details page using the Add Docs button. Refer to When the page is launched from the Add Docs button for details.
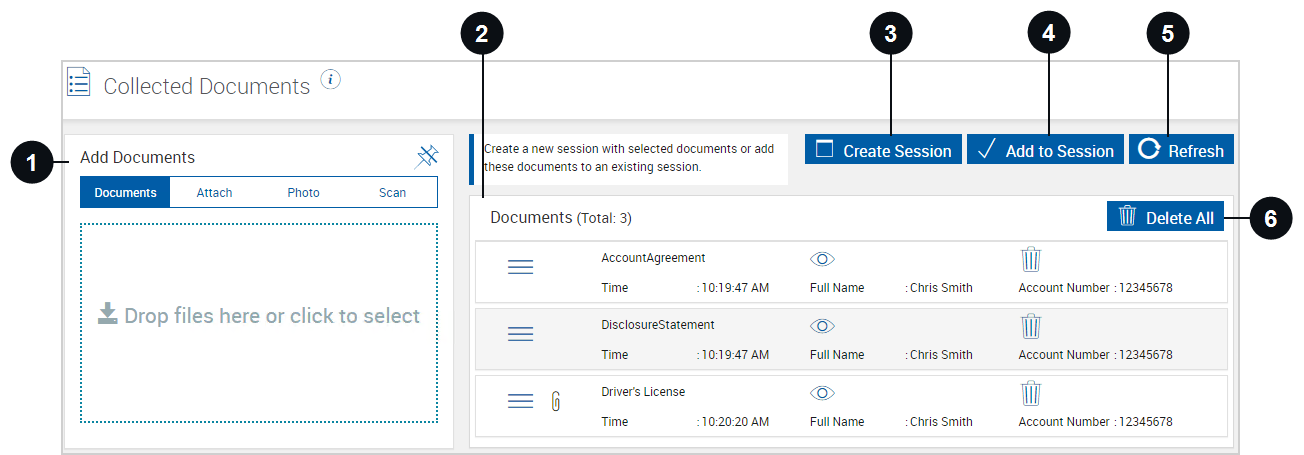
When documents are printed or saved to the eSign Client input folders, the eSign browser is automatically launched and displays the uploaded documents on the Collected Documents page. The Add Documents area is collapsed by default.

|
Add Documents | Add documents, attachments, photos, and scanned items to the Collected Documents page. Once added, the file appears in the Documents section and is ready to be used for a new session or an existing session. At least one document must be included in the Documents section before the Attach, Photo, and Scan features can be used.
|
|||||||||||||||
|
|
Documents |
The Documents section contains all of the documents that have been chosen as part of a document set. These documents can be added to an existing session or used to create a new session. When documents are printed or saved to the eSign Client input folders, the eSign browser is launched automatically and displays the uploaded documents in the Documents section. If the eSign web browser is already open, the eSign web browser does not automatically launch. Instead, refresh the Collected Documents page within the existing eSign window or click the Add Docs button on the Session Details page to display the new documents. If the document set is not used to create a session or is not added to an existing session, it will be available on the Collected Documents page for a designated amount of time unless it is manually deleted from eSign. The designated amount of time is based on the Document Expiration field in the Client Settings popup window. Refer to eSign Client (RTS) to learn more. Review and manage the documents in this area as needed. For each document, view the time that the document was uploaded to eSign and the document indexes. Click the row to view additional document indexes. If index names or values are cut off in the row, hover over the area to view all of the text.
|
|||||||||||||||

|
Create Session | Create a session using the documents in the Documents section. When Create Session is clicked, the document set is processed, a session is created, and the Session Details page is displayed. If there are documents that are not associated with a template, you are directed to assign the documents to a template in Document Designer before continuing. Refer to Unknown Documents on the Collected Documents Page for details. |
|||||||||||||||

|
Add to Session | Add the documents in the Documents section to an existing session. When Add to Session is clicked, the Search Active Sessions popup is displayed. Refer to Searching Active Sessions for details about using the search panel in the Search Active Sessions popup. Not all Search Active Sessions page features are available in the Search Active Sessions popup. Once the search results are displayed, select the session that you would like to add the documents to, and then click Continue. Once the document set is updated, the Session Details page is displayed. If there are documents that are not associated with a template, you are directed to assign the documents to a template in Document Designer before continuing. Refer to Unknown Documents on the Collected Documents Page for details. |
|||||||||||||||
|
|
Refresh |
Manually reload the Collected Documents page to display documents that are printed or saved while the eSign browser is open. | |||||||||||||||

|
Delete All | Delete all of the documents with one click. |

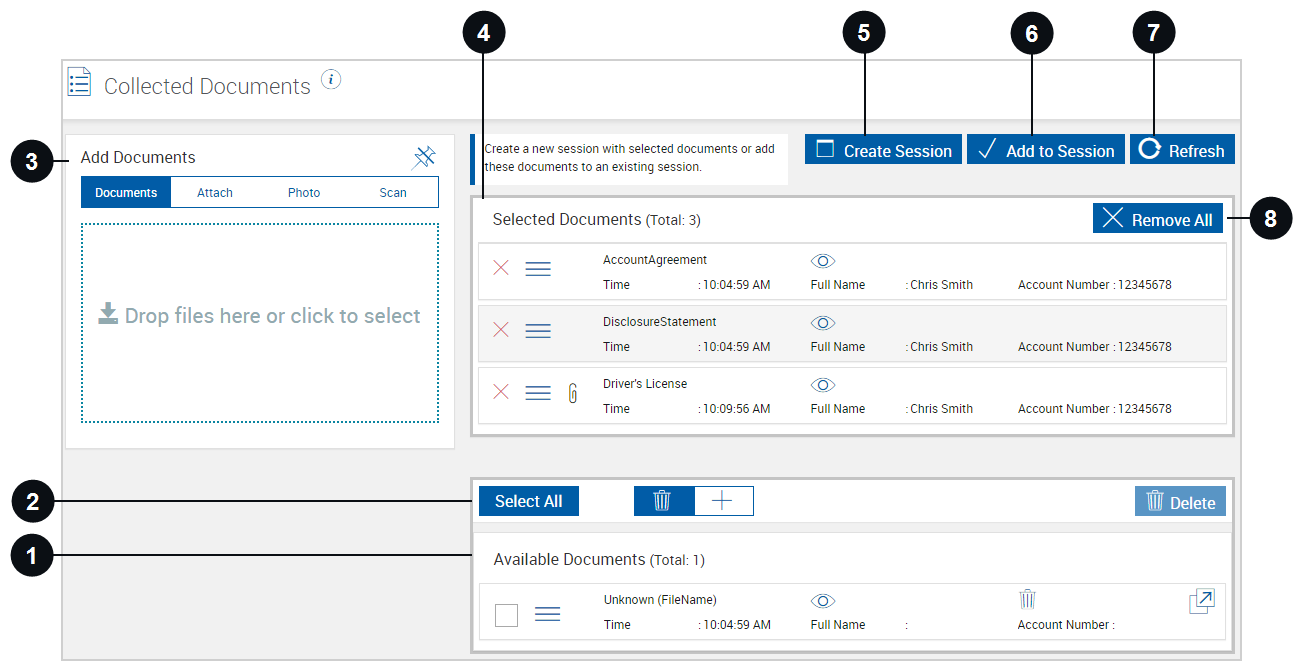
Manually launch the Collected Documents page from the eSign Client icon. Right-click the eSign Client icon and click Show Documents. The Add Documents area is expanded by default.
|
|
Available Documents |
The Available Documents section is a repository that provides the ability to add documents to the Selected Documents section where they can be added to an existing session or used to create a new session. Unless manually deleted, documents that are not used to create a session or added to an existing session will continue to be available on the Collected Documents page for a designated amount of time. The designated amount of time is based on the Document Expiration field in the Client Settings popup window. Refer to eSign Client (RTS) to learn more. Review and manage the documents in this area as needed. For each document, view the time that the document was uploaded to eSign and the document indexes. Click the row to view additional document indexes. If index names or values are cut off in the row, hover over the area to view all of the text.
|
||||||||||||||||||
|
|
Controls for Available Documents Section |
Use the controls here to manage the documents in the Available Documents section.
|
||||||||||||||||||
|
|
Add Documents | Add documents, attachments, photos, and scanned items to the Collected Documents page. Once added, the file appears in the Selected Documents section. At least one document must be included in the Selected Documents section before the Attach, Photo, and Scan features can be used.
|
||||||||||||||||||
|
|
Selected Documents | The Selected Documents section contains all of the documents that have been chosen as part of a document set. These documents can be added to an existing session or used to create a new session. The Selected Documents section is not displayed if there are no selected documents. Review and manage the documents in this area as needed. For each document, view the time that the document was uploaded to eSign and the document indexes. Click the row to view additional document indexes. If index names or values are cut off in the row, hover over the area to view all of the text.
|
||||||||||||||||||

|
Create Session |
Create a session using the documents in the Selected Documents section. When Create Session is clicked, the document set is processed, a session is created, and the Session Details page is displayed.
If there are documents that are not associated with a template, you are directed to assign the documents to a template in Document Designer before continuing. Refer to Unknown Documents on the Collected Documents Page for details. |
||||||||||||||||||
|
|
Add to Session |
Add the documents in the Selected Documents section to an existing section. When Add to Session is clicked, the Search Active Sessions popup is displayed. Refer to Searching Active Sessions for details about using the search panel in the Search Active Sessions popup. Not all Search Active Sessions page features are available in the Search Active Sessions popup. Once the search results are displayed, select the session that you would like to add the documents to and then click Continue. Once the document set is updated, the Session Details page is displayed.
If there are documents that are not associated with a template, you are directed to assign the documents to a template in Document Designer before continuing. Refer to Unknown Documents on the Collected Documents Page for details. |
||||||||||||||||||
|
|
Refresh |
Manually reload the Collected Documents page to display documents that are printed or saved while the eSign browser is open. |
||||||||||||||||||

|
Remove All | When Remove All is clicked, all of the documents are moved from the Selected Documents section to the Available Documents section. |


Manually launch the Collected Documents page from the eSign browser. Click Processing > Collected Documents. The Add Documents area is expanded by default.
|
|
Available Documents |
The Available Documents section is a repository that provides the ability to add documents to the Selected Documents section where they can be added to an existing session or used to create a new session. Unless manually deleted, documents that are not used to create a session or added to an existing session will continue to be available on the Collected Documents page for a designated amount of time. The designated amount of time is based on the Document Expiration field in the Client Settings popup window. Refer to eSign Client (RTS) to learn more. Review and manage the documents in this area as needed. For each document, view the time that the document was uploaded to eSign and the document indexes. Click the row to view additional document indexes. If index names or values are cut off in the row, hover over the area to view all of the text.
|
||||||||||||||||||
|
|
Controls for Available Documents Section |
Use the controls here to manage the documents in the Available Documents section.
|
||||||||||||||||||
|
|
Add Documents | Add documents, attachments, photos, and scanned items to the Collected Documents page. Once added, the file appears in the Selected Documents section. At least one document must be included in the Selected Documents section before the Attach, Photo, and Scan features can be used.
|
||||||||||||||||||
|
|
Selected Documents | The Selected Documents section contains all of the documents that have been chosen as part of a document set. These documents can be added to an existing session or used to create a new session. The Selected Documents section is not displayed if there are no selected documents. Review and manage the documents in this area as needed. For each document, view the time that the document was uploaded to eSign and the document indexes. Click the row to view additional document indexes. If index names or values are cut off in the row, hover over the area to view all of the text.
|
||||||||||||||||||
|
|
Create Session |
Create a session using the documents in the Selected Documents section. When Create Session is clicked, the document set is processed, a session is created, and the Session Details page is displayed.
If there are documents that are not associated with a template, you are directed to assign the documents to a template in Document Designer before continuing. Refer to Unknown Documents on the Collected Documents Page for details. |
||||||||||||||||||
|
|
Add to Session |
Add the documents in the Selected Documents section to an existing section. When Add to Session is clicked, the Search Active Sessions popup is displayed. Refer to Searching Active Sessions for details about using the search panel in the Search Active Sessions popup. Not all Search Active Sessions page features are available in the Search Active Sessions popup. Once the search results are displayed, select the session that you would like to add the documents to and then click Continue. Once the document set is updated, the Session Details page is displayed.
If there are documents that are not associated with a template, you are directed to assign the documents to a template in Document Designer before continuing. Refer to Unknown Documents on the Collected Documents Page for details. |
||||||||||||||||||
|
|
Refresh |
Manually reload the Collected Documents page to display documents that are printed or saved while the eSign browser is open. | ||||||||||||||||||
|
|
Remove All | When Remove All is clicked, all of the documents are moved from the Selected Documents section to the Available Documents section. |
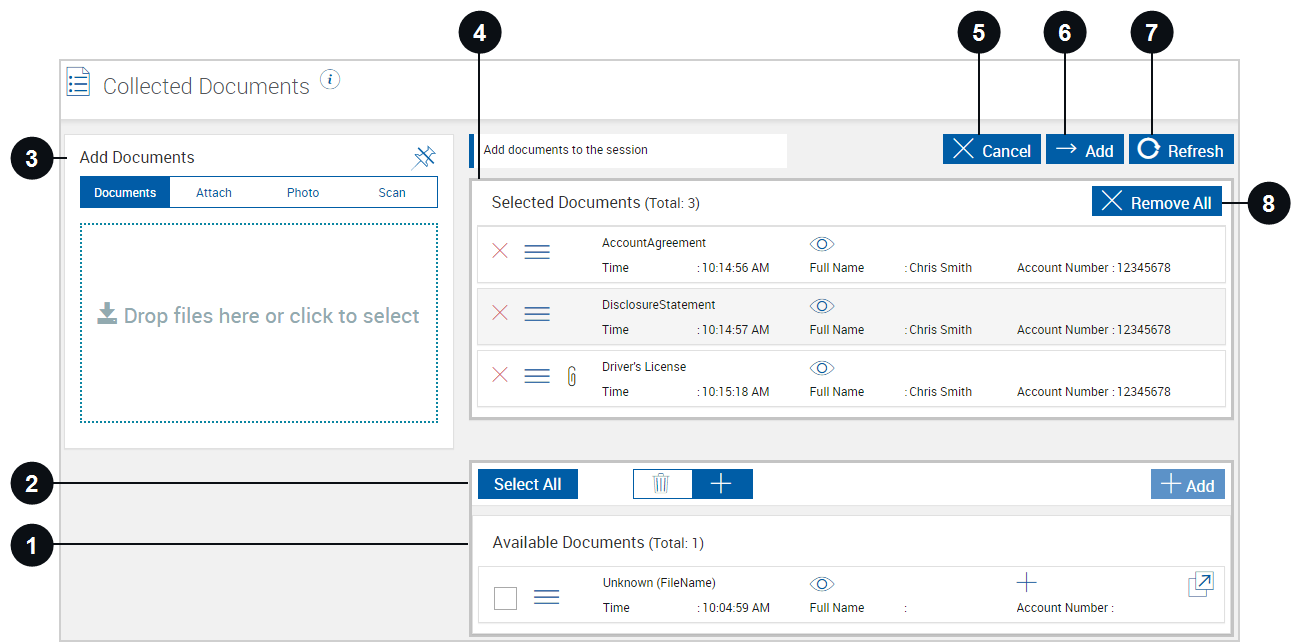
While working on an existing
|
|
Available Documents | The Available Documents section is a repository that provides the ability to add documents to the Selected Documents section where they can be added to an existing session or used to create a new session. Unless manually deleted, documents that are not used to create a session or added to an existing session will continue to be available on the Collected Documents page for a designated amount of time. The designated amount of time is based on the Document Expiration field in the Client Settings popup window. Refer to eSign Client (RTS) to learn more. Review and manage the documents in this area as needed. For each document, view the time that the document was uploaded to eSign and the document indexes. Click the row to view additional document indexes. If index names or values are cut off in the row, hover over the area to view all of the text.
|
||||||||||||||||||
|
|
Controls for Available Documents Section |
Use the controls here to manage the documents in the Available Documents section.
|
||||||||||||||||||
|
|
Add Documents | Add documents, attachments, photos, and scanned items to the Collected Documents page. Once added, the file appears in the Selected Documents section.
|
||||||||||||||||||
|
|
Selected Documents | The Selected Documents section contains all of the documents that have been chosen as part of a document set. These documents can be added to an existing session or used to create a new session. The Selected Documents section is not displayed if there are no documents in the section. Review and manage the documents in this area as needed. For each document, view the time that the document was uploaded to eSign and the document indexes. Click the row to view additional document indexes. If index names or values are cut off in the row, hover over the area to view all of the text.
|
||||||||||||||||||
|
|
Cancel |
Return to the Session Details page without adding any documents to the current session. |
||||||||||||||||||
|
|
Add |
Add the documents in the Selected Documents section to the current session. The Session Details page is displayed. If there are documents that are not associated with a template, you are directed to assign the documents to a template in Document Designer before continuing. Refer to Unknown Documents on the Collected Documents Page for details. |
||||||||||||||||||
|
|
Refresh |
Manually reload the Collected Documents page to display documents that are printed or saved while the eSign browser is open. |
||||||||||||||||||
|
|
Remove All | When Remove All is clicked, all of the documents are moved from the Selected Documents section to the Available Documents section. |
When the Validate Collected Documents Page feature is enabled by your administrator, eSign can detect if there are index mismatches between documents on the Collected Documents page to prevent incorrect documents from being included in a session.
A warning message is displayed at the top of the page when the document is in the Documents or Selected Documents area of the Collected Documents page: Indexes do not match and/or indexes are not known. Review the documents and resolve the discrepancies before proceeding. The warning message is not displayed when the document is in the Available Documents area. The areas that are visible depend on how you accessed the Collected Documents page.

This is an example of what the Documents area of the Collected Documents page looks like when there are mismatched and unknown documents. The warning message is displayed because the Full Name and Account Number indexes in one document (CarLoan) do not match the indexes in the other documents and because there are empty indexes in another document (an unknown document). In this example, the CarLoan document does not belong with this document set and should be deleted. The Unknown (filename) document should be deleted, assigned to an existing template, or a template must be created (depending on your permissions). Refer to Unknown Documents on the Collected Documents Page for details about documents that are not assigned to template on the Collected Documents page. The Documents area is visible when the page is automatically launched. Refer to When the page is automatically launched for details about the Documents area.

If you attempt to create a new session or add the documents to an existing session without resolving index issues and unknown documents first, a popup window will be displayed. Click Cancel to return to the Collected Documents page, review the indexes and unknown documents, and manage the documents as needed. Click Continue to confirm that all selected documents are accurate and to proceed.

When a document is added on the Collected Documents page that is not assigned to a template (e.g., "undefined" or "unknown"), the document is displayed on the Collected Documents page with the file name in parentheses. This is an example.

A warning message is displayed at the top of the page when the document is in the Documents or Selected Documents area of the Collected Documents page: Indexes do not match and/or indexes are not known. Review the documents and resolve the discrepancies before proceeding. The warning message is not displayed when the document is in the Available Documents area. The areas that are visible depend on how you accessed the Collected Documents page.
If you attempt to create a new session or add the documents to an existing session without resolving index issues and unknown documents first, a popup window will be displayed. The unknown document should be deleted, assigned to an existing template, or a template must be created (depending on your permissions).
Click Cancel to return to the Collected Documents page, review the indexes and unknown documents, and manage the documents as needed.
Click Continue to confirm that all selected documents are accurate and to proceed. If there is an unknown document, you will be directed to Document Designer to assign a template to the unknown document (depending on the permissions set by your administrator). Refer to Assigning a Template to an Unknown Document (RTS) for details about assigning a template to a document.
Note: Depending on the permissions set by your administrator, you may see the Open Template Manager  icon when an unknown document is on the Collected Documents page. When a document is not assigned to a template (e.g., "undefined" or "unknown"), click the Open Template Manager icon to launch the Template Manager. On the Template Manager page, create a template for the document. Once the template is completed, you are returned to the Collected Documents page to view any remaining documents. If you do not have permissions to create a template, this icon is not displayed. This setting is configured by the administrator.