Financial Institution (FI) Setup (eSignPlus)
Getting Started
After eSignPlus has been installed on the server and client workstations, several settings should be performed before beginning to process documents.
| Step |
Function of |
|---|---|
| Configure Client Workstation Settings. | All workstations used to process documents will need these settings. |
|
Sign In as a User with Administrator permissions to setup and modify FI Settings. |
FI Administrator |
|
Change Password if necessary. |
FI Administrator |
| Modify Financial Institution Settings | FI Administrator |
| Add Users | FI Administrator |
| Modify Index and Dictionary Settings (XML) | FI Administrator |
| Upload Documents (XML) | FI Administrator |
| Define Attachment Documents (XML) | FI Administrator |
| Add Document Sets (XML) | FI Administrator |
| Set Up Document Mover Service | FI Administrator |
Client Workstation Settings
Refer to Client Workstation Settings for browser settings.
Sign In
Non-Microsoft Azure Sign In
When you process document transactions from your host, you are taken directly to the Session Details window. You will be automatically connected through your sign-in information. If you need to manually sign in, follow this procedure.
- From your web browser, navigate to http://YourServer/TeAASP/Login.aspx.
- The Login Screen appears.
All items are required.


Financial Institution (FI) ID: Enter your Financial Institution ID.

User ID: Enter your User ID (FI Administrator: FIAdmin).

Password: Enter your password.

Remember Me: As the Administrator, checking this check box will store the User ID for use with subsequent sign ins. (The Remember Me check box may not display on all Login screens.)

Action Buttons:
- Login: Click to complete the sign in procedure.
- Cancel: Clear all input boxes.
- The Documents Maintenance (XML) page appears.
You have successfully logged into eSign.
After 3 unsuccessful login attempts, your account will be locked out.
Contact the Host Administrator to have your account unlocked.
- On some installations, Password Expiration controls may be set (IMMAdmin setting), resulting in password related messages.
Microsoft Azure Active Directory Login (Cloud-Based Installation)
When you process document transactions from your host, you are taken directly to the Session Details window after confirming your credentials with Microsoft Azure.
If you need to manually log in, follow this procedure.
- From your web browser, navigate to https://immesign.com/TeAASP/Login.aspx.
- The Login Screen appears. Enter your Financial Institution ID.
Financial Institution (FI) ID: Enter your Financial Institution ID.
User ID: Not applicable.
Password: Not applicable.
Remember Me: Not applicable. (The Remember Me check box may not display on all Login screens.)
Action Buttons:
- Login: Click to complete the login procedure.
- Cancel: Clear all input boxes.
- On the Microsoft login page, click your account.
If your account is not listed, click Use another account.

- If you clicked Use another account, enter your Microsoft user sign in, and then click Next.

- Enter your Microsoft password, and then click Sign in.

- The Documents Maintenance (XML) page appears.
You have successfully logged into eSign.
Failed sign in lockouts can be configured through Microsoft Azure.
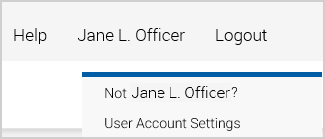
Stop: To log out of eSign in cloud-based installations using Microsoft Azure Active Directory, you must click on the [User Name] menu and select Not [Username]? to log out of the application. Clicking the Logout menu item will not log you out. It is important to log out using this method for security.
Change Password
If necessary after logging in as an administrator, click your User Name > User Account Settings.

The User Account Settings page appears.
|
|
Click Reset Password. |

The User Account Settings page refreshes.
|
|
Enter a New Password. |
|
|
Enter the new password in Confirm New Password. |
|
|
Click Save. |

Create User with Administrator Permissions
The first step in setting up a new Financial Institution (FI) is to create a user within your organization that will have administrator access to eSign.
That user should then be specifically added to eSign and provided with the necessary permissions.
This procedure will add a user who will be used to perform administrative functions. Administrative functions should only be performed as a user that is logged on from your host and has been assigned Administrators permissions. Refer to Group Maintenance and User Maintenance for additional information.
After connecting as the FIAdmin, click Administration > Users.
The User Maintenance page displays.
|
|
Click Add New |


A new user template appears.
|
|
Enter a User ID. |
|
|
Enter a Name. |
|
|
Enter the user Domain. |
|
|
Enter the user Email (Default Senders Email). |
|
|
Click Groups to display the Groups tab. |


The new user template displays groups currently associated with the new user. By default all new users will initially be associated with the Users group.
|
|
Click the Add Group icon. |


The Add Groups pop-up appears.

|
|
Check the check box for Administrators. |
|
|
Click Done. |


|
|
On the new user template, check the check box for Users. |
|
|
Click the Remove Group icon to remove the User group from the administrator. The default Administrator group permissions will allow the Administrator to perform all user functions in addition to all Administrator functions. |
|
|
Click Details to return to the Details tab. |


|
|
Enter a New Password. |
|
|
Repeat the password in the Confirm New Password text box. |
|
|
After confirming all information, click Save. |


Use the Permissions and Effective Permission Summary tabs to review permission settings.
Log off from eSign and reconnect as the new administrative user.
Continue setting up your FI as the new administrative user.
Modify Financial Institution Settings
Click Administration > General Settings.
Adjust settings for your FI as necessary. Follow the procedures listed at General Settings (RTS/XML/eSignPlus).
Add Users
Depending on your configuration, it may be necessary to add users before they can process or define documents.
eSignPlus Installations: Refer to to User Maintenance (eSignPlus)
Non-eSignPlus Installations: Refer to User Maintenance
Modify Index and Dictionary Settings (XML)
It may be necessary to modify your index and dictionary settings. Follow the procedures in the Imaging Index Service Administrator Guide for detailed information on these settings.
Upload Documents (XML)
Follow the procedures listed at Upload Documents (XML).
Define Attachment Documents (XML)
Follow the procedures listed at Define Attachment Documents (XML).
Add Document Sets (XML)
Follow the procedures listed at Document Sets Maintenance (XML).
Set Up Document Mover Service
Follow the Administrator procedures listed in the Document Mover Install/Upgrade/Administrator Guide.